By: Team BrainTrain Since: Jan 2019 Licence: MIT
- 1. Introduction
- 2. Setting up
- 3. Design
- 4. Implementation
- 5. Documentation
- 6. Testing
- 7. Dev ops
- Appendix A: Product scope
- Appendix B: User stories
- Appendix C: Use cases
- Appendix D: Non-functional requirements
- Appendix E: Glossary
- Appendix F: Instructions for manual testing
- F.1. Launch and shutdown
- F.2. Changing theme
- F.3. Adding a lesson
- F.4. Deleting a lesson
- F.5. Editing a lesson
- F.6. Setting a lesson’s test pair
- F.7. Adding a card
- F.8. Deleting a card
- F.9. Starting a new quiz
- F.10. Answering a question in a quiz
- F.11. Labelling a question as difficult in a quiz
- F.12. Viewing hint in a quiz
- F.13. Quitting the quiz
- F.14. Viewing status in a quiz
- F.1. Launch and shutdown
1. Introduction
This is the Developer Guide for BrainTrain. This assumes you’re already familiar with the User Guide, and are interested in contributing to this project.
Other skills useful for contributing to BrainTrain are as follows:
-
Good Java knowledge
-
Familiarity with Object-Oriented Programming (OOP)
-
Familiarity with Github
-
Experience with Command Line Interface based applications
Whether you have any, none or all of the skills above, you will first need to set up a few things before being able to start work on the project.
1.1. How does BrainTrain work
This is a brief explanation of how BrainTrain works:
-
You can attempt cards in quiz mode, these cards whereby a question is displayed to you, and you type in the answer.
-
You can group multiple cards in a single package called a lesson. You can have multiple lessons.
-
You can manage lessons in management mode or alternatively do so in your preferred spreadsheet application.
2. Setting up
2.1. Prerequisites
-
JDK
9or laterJDK 10on Windows will fail to run tests in headless mode due to a JavaFX bug. Windows developers should use JDK9. -
IntelliJ IDE
IntelliJ by default has Gradle and JavaFx plugins installed.
Do not disable them. If you have disabled them, go toFile>Settings>Pluginsto re-enable them.
2.2. Setting up the project in your computer
-
Fork this repo
-
Clone the fork to your computer
-
Open IntelliJ (if you are not in the welcome screen, click
File>Close Projectto close the existing project dialog first) -
Set up the correct JDK version for Gradle
-
Click
Configure>Project Defaults>Project Structure -
Click
New…and find the directory of the JDK
-
-
Click
Import Project -
Locate the
build.gradlefile and select it. ClickOK -
Click
Open as Project -
Click
OKto accept the default settings -
Open a console and run the command
gradlew processResources(for Mac/Linux:./gradlew processResources). It should finish with theBUILD SUCCESSFULmessage.
This will generate all resources required by the application and tests. -
Open
MainWindow.javaand check for any code errors-
Due to an ongoing issue with some of the newer versions of IntelliJ, code errors may be detected even if the project can be built and run successfully
-
To resolve this, place your cursor over any of the code section highlighted in red. Press ALT+ENTER, and select
Add '--add-modules=…' to module compiler optionsfor each error
-
-
Repeat this for the test folder as well (e.g. check
HelpWindowTest.javafor code errors, and if so, resolve it the same way)
2.3. Verifying the setup
-
Run the
seedu.address.MainAppand try a few commands -
Run the tests to ensure they all pass.
2.4. Configurations to do before writing code
2.4.1. Configuring the coding style
This project follows oss-generic coding standards. IntelliJ’s default style is mostly compliant with ours but it uses a different import order from ours. To rectify,
-
Go to
File>Settings…(Windows/Linux), orIntelliJ IDEA>Preferences…(macOS) -
Select
Editor>Code Style>Java -
Click on the
Importstab to set the order-
For
Class count to use import with '*'andNames count to use static import with '*': Set to999to prevent IntelliJ from contracting the import statements -
For
Import Layout: The order isimport static all other imports,import java.*,import javax.*,import org.*,import com.*,import all other imports. Add a<blank line>between eachimport
-
Optionally, you can follow the UsingCheckstyle.adoc document to configure Intellij to check style-compliance as you write code.
2.4.2. Setting up CI
Set up Travis to perform Continuous Integration (CI) for your fork. See UsingTravis.adoc to learn how to set it up.
After setting up Travis, you can optionally set up coverage reporting for your team fork (see UsingCoveralls.adoc).
| Coverage reporting could be useful for a team repository that hosts the final version but it is not that useful for your personal fork. |
Optionally, you can set up AppVeyor as a second CI (see UsingAppVeyor.adoc).
| Having both Travis and AppVeyor ensures your app works on both Unix-based platforms and Windows-based platforms (Travis is Unix-based and AppVeyor is Windows-based) |
3. Design
3.1. Architecture
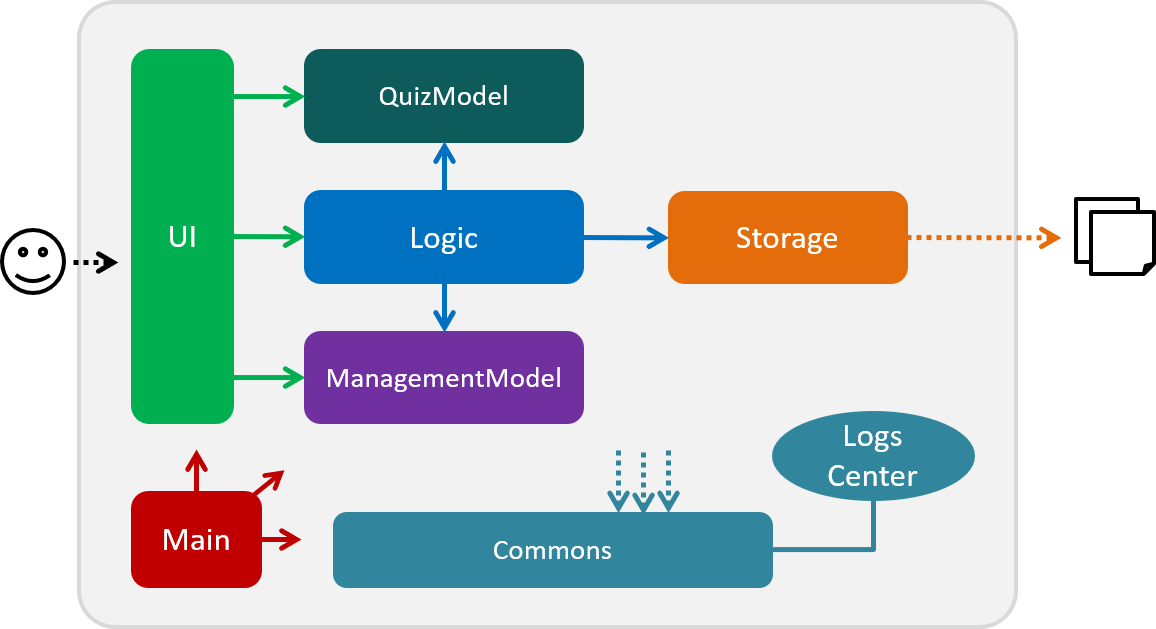
The .pptx files used to create diagrams in this document can be found in the diagrams folder. To update a diagram, modify the diagram in the pptx file, select the objects of the diagram, and choose Save as picture.
|
The architecture diagram given above illustrates the high-level design of the BrainTrain app. It shows the key components of the app, and how they interact with one another.
3.1.1. Brief overview of key components
-
Mainhas only one class calledMainAppwhich is responsible for:-
Initializing the components in the correct sequence and connecting them at app launch.
-
Shutting down the components and invoking necessary clean-up methods at app closure.
-
-
Commonsis a collection of classes which provides useful utility methods used by multiple other components. The following class plays an important role at the architecture level:-
LogsCenter: Used by numerous classes to write log messages to the app’s log file.
-
-
UI: Handles the user interface. -
Logic: Handles the command executions. -
ManagementModel: Handles the in-memory data of management mode. -
QuizModel: Handles the in-memory data of quiz mode. -
Storage: Reads and writes data to the hard disk.
The UI, Logic, ManagementModel, QuizModel and Storage components have the following structure:
-
Has an API in the form of an Java interface named after the component.
-
Has its functionality exposed through a Java class named
{Component Name}Manager.
For example, the Logic component (refer to figure 2 below) has it’s API defined in the Logic.java interface, and exposes its functionality through the LogicManager.java class.
Logic componentHow do the key components interact
In this section, an example of how the key components interact when the user issues the command deleteLesson 1 is shown.
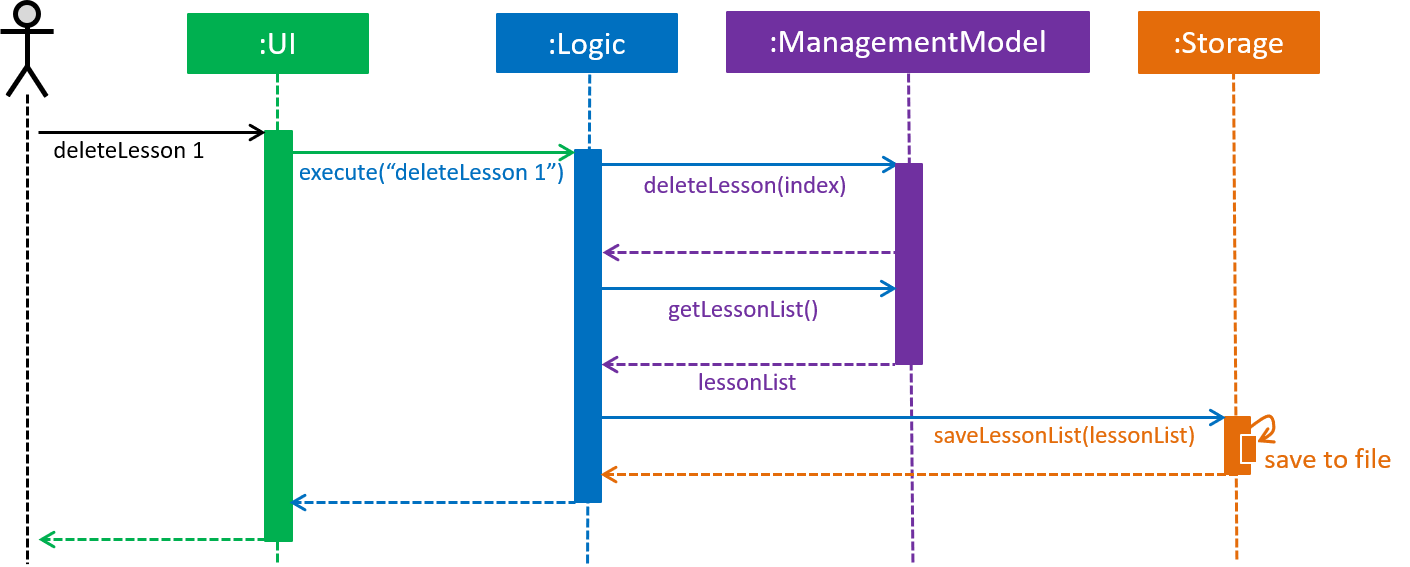
deleteLesson 1 commandSequence diagrams such as the one above will be provided throughout the developer guide when it is important to highlight how the key components interact. Subsequent sections provide more details on each key component.
3.2. UI component
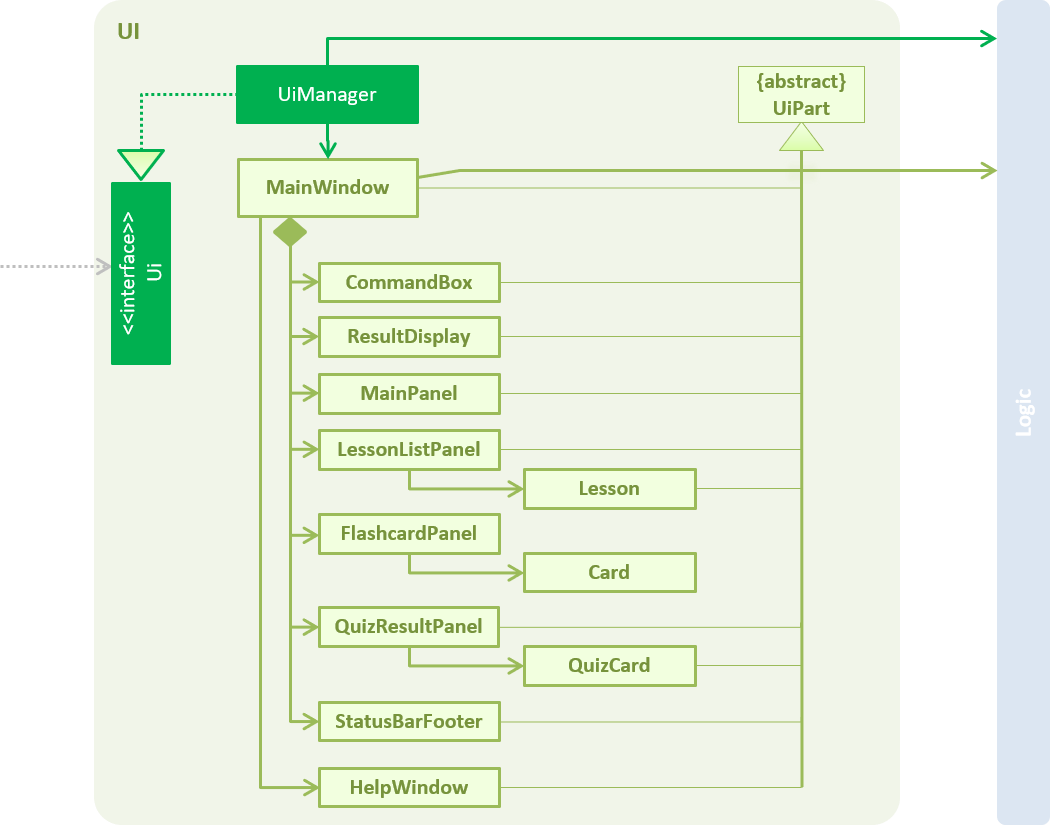
UI ComponentAPI : Ui.java
The UI consists of a MainWindow which is made up of the following parts: CommandBox, ResultDisplay,
MainPanel, LessonListPanel, QuizResultPanel, etc. All these parts, including the MainWindow,
inherit from the UiPart abstract class.
The UI component uses the JavaFx UI framework. The layouts for these UI parts are defined in corresponding .fxml files in the src/main/resources/view folder. For example, the layout for MainWindow is specified in the MainWindow.fxml.
The UI component,
-
passes user input to the
Logiccomponent for command execution. -
listens for changes to
Logicand updates if data is changed.
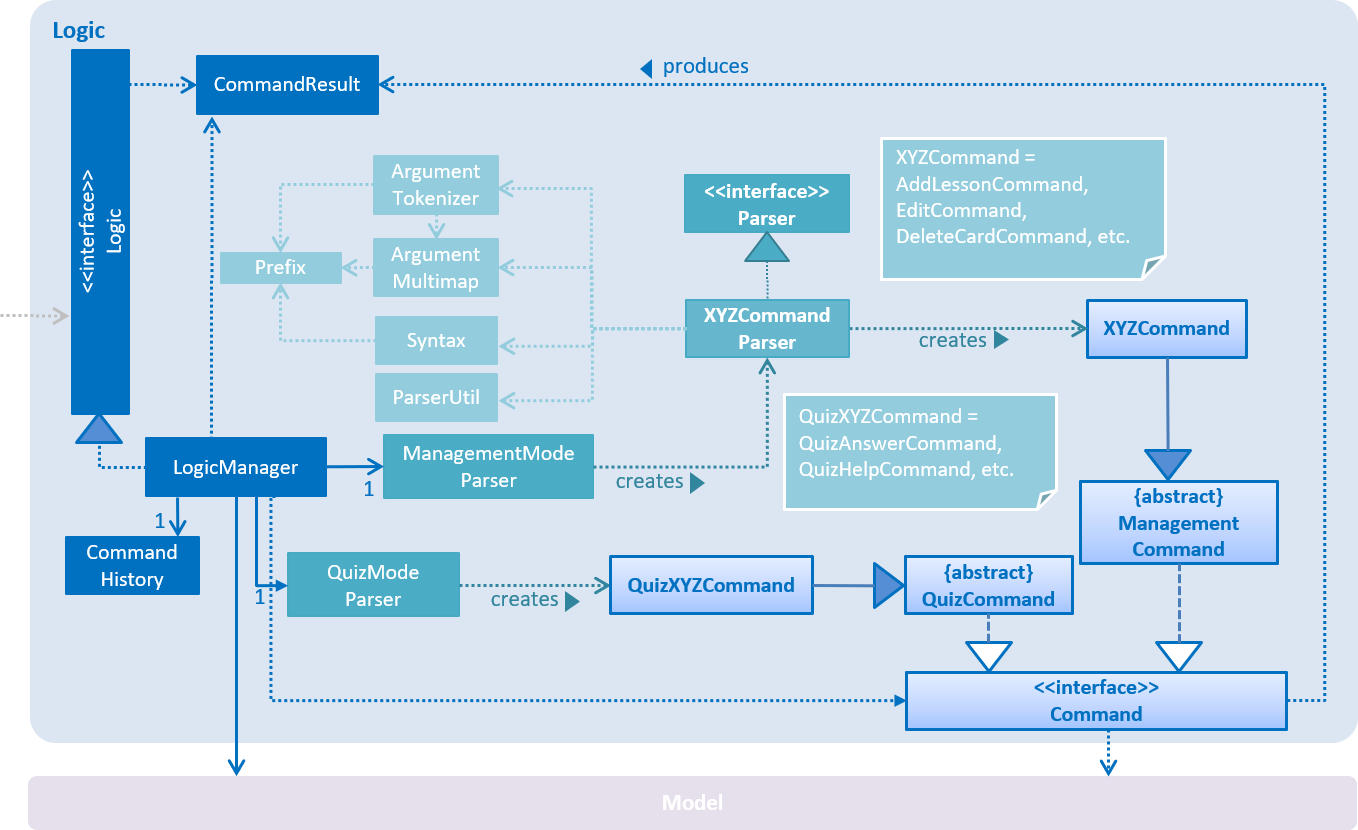
3.3. Logic component
Logic componentAPI :
Logic.java
-
Logicuses eitherManagementModeParserorQuizModeParserclass to parse the user command.-
If
ManagementModeParseris used to parse the user command:-
This results in a
ManagementCommandobject which is executed by theLogicManager. -
The command execution can affect the
ManagementModel(e.g. adding a lesson).
-
-
If
QuizModeParseris used to parse the user command:-
This results in a
QuizCommandobject which is executed by theLogicManager. -
The command execution can affect the
QuizModel(e.g. answering a question).
-
-
-
The result of the command execution is encapsulated as a
CommandResultobject which is returned to theUI. -
In addition, the
CommandResultobject might also instruct theUIto perform certain actions, such as displaying the user guide to the user.
3.3.1. How do the logic sub-components interact
In this section, an example of how the Logic sub-components interact when the user issues the command addCard t/Korea t/Seoul h/S is shown.

Given the above example, the following sequence of interactions will occur within the Logic component.
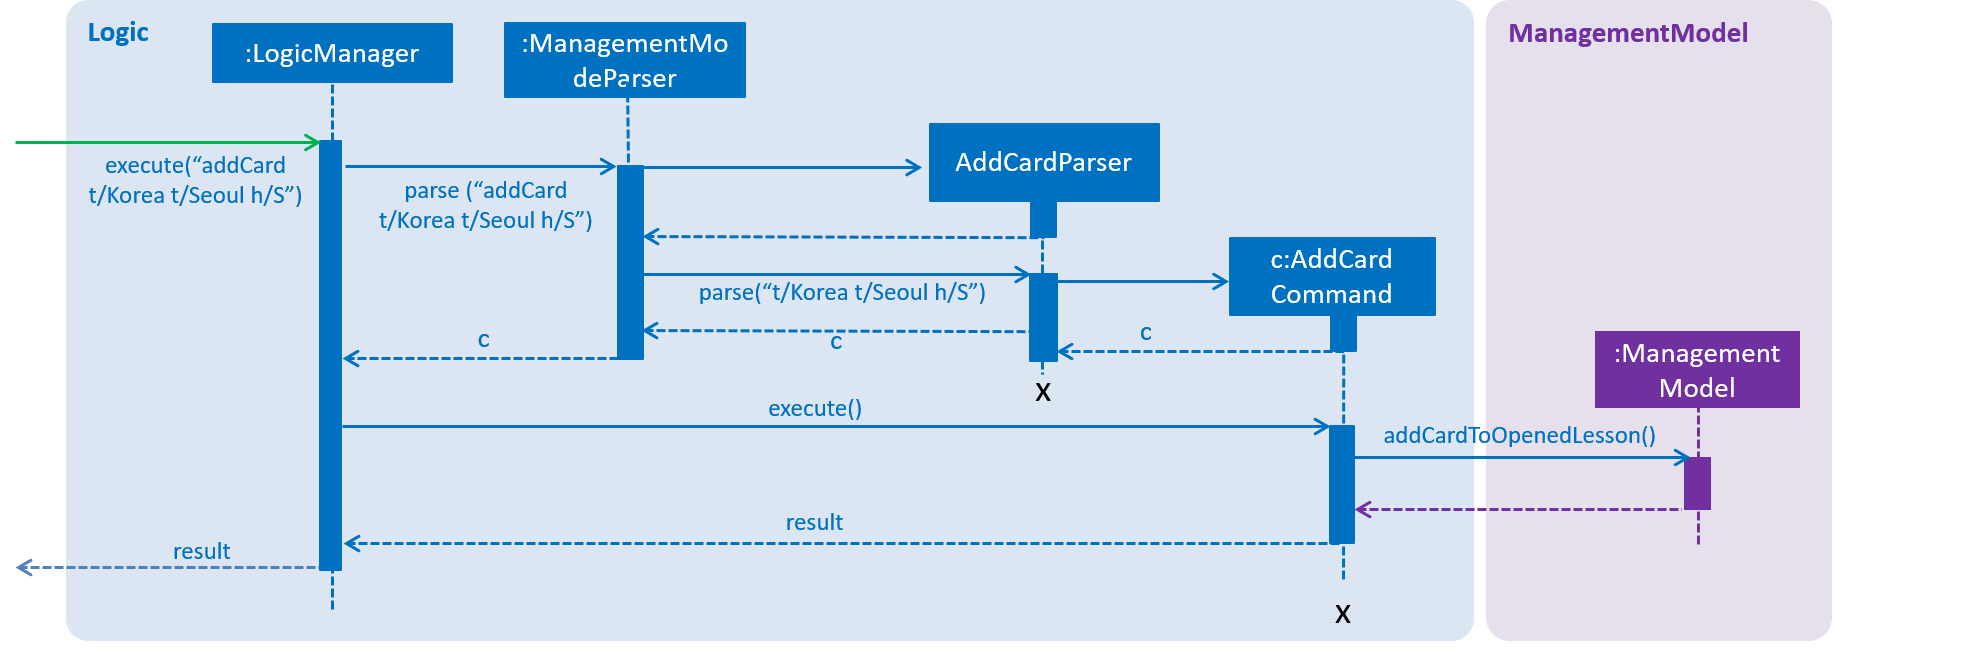
addCard t/Korea t/Seoul h/S command3.4. ManagementModel component
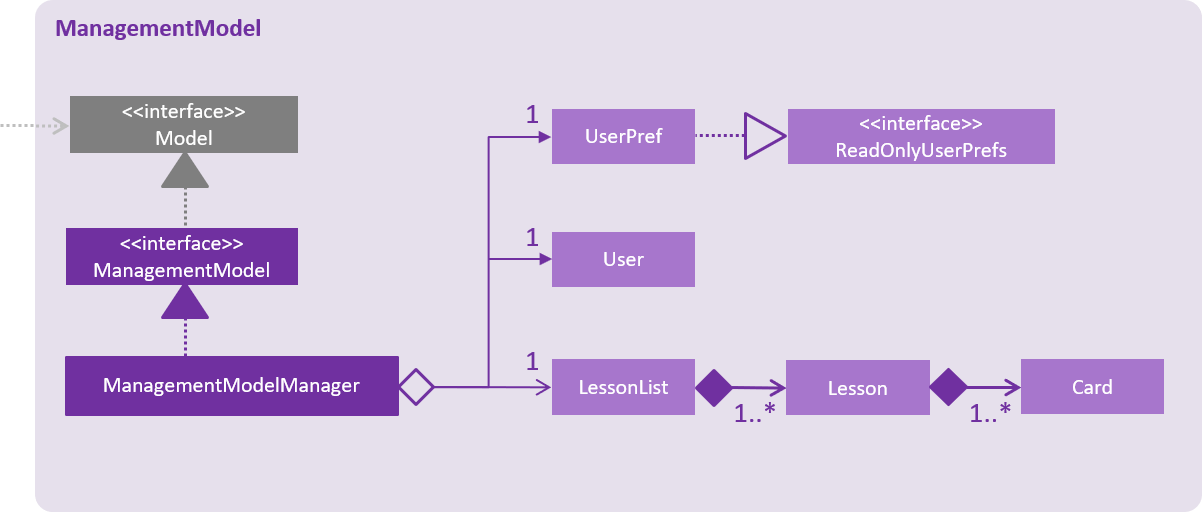
API : ManagementModel.java
The ManagementModel,
-
stores a
LessonListobject which represents a list ofLessonobjects. -
stores a
UserPrefobject which represents the user’s preferences. -
stores the in-memory user SRS data in
User. -
does not depend on any other components.
3.5. QuizModel component
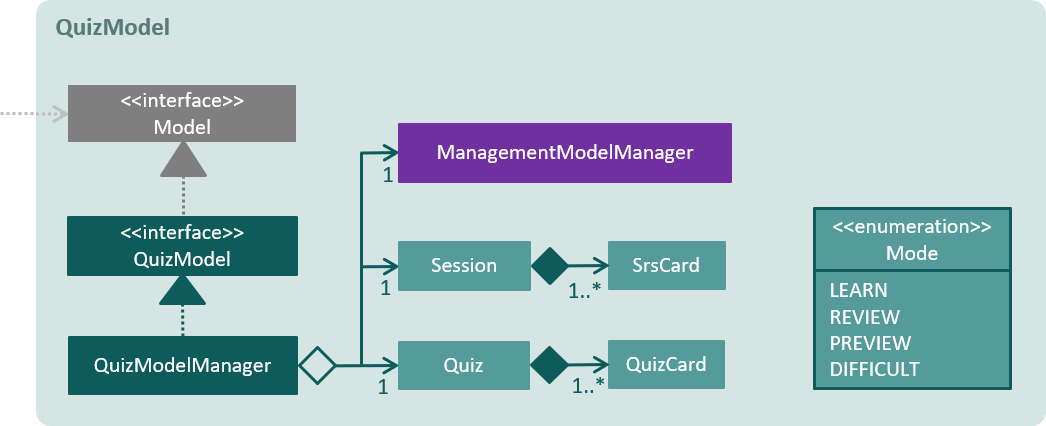
API : QuizModel.java
The QuizModel,
-
stores a
Quizobject that represents a list ofQuizCard. -
stores a
Sessionobject that represents a list ofSrsCard. -
stores a
ManagementModelManagerobject that represents theManagementModelcomponent. -
depends on only the
ManagementModelcomponent.
3.6. Storage component
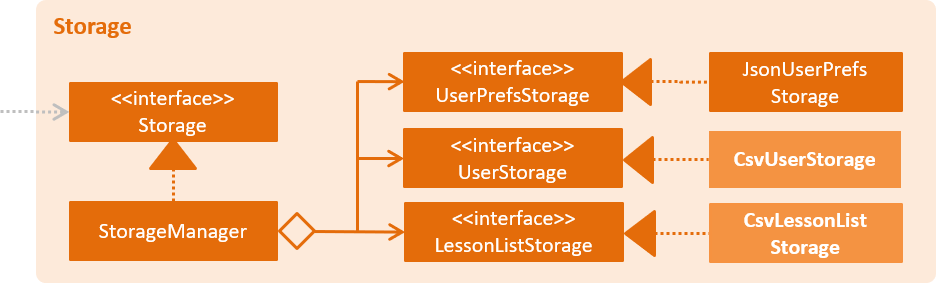
API : Storage.java
The Storage component,
-
saves lesson data in
.csvformat and read it back. -
saves user preferences in
.jsonformat and read it back. -
saves the user’s SRS data in
.csvformat and read it back.
4. Implementation
This section describes some noteworthy details on how certain features are implemented.
4.1. User storage feature
The user storage features implements the following functions:
-
Parsing user data into the correct format for file saving
-
Parsing file into the correct format for user data
These functions are automatically performed on opening/closing the application. File I/O is handled in the CSVUtil class.
|
4.1.1. User format

The user is parsed by CsvUserStorage, which is converted between User and List<String[]> format. List<String[]> format is the primary format handled by CsvUtil for reading and writing to .csv files.
A few noteworthy mentions of the main components saved into a .csv file for UserStorage are listed below.
4.1.2. Hashcode
This is the question hashcode. Every question will have a unique hashcode for identification.
4.1.3. SRSDueDate
This is the srsDueDate generated for that question. Questions with a nearer due-date will be generated first in the quiz.
4.1.4. Difficult
These are questions that are labelled difficult by the user. Users are able to specifically practise questions that they have labelled difficult in session.
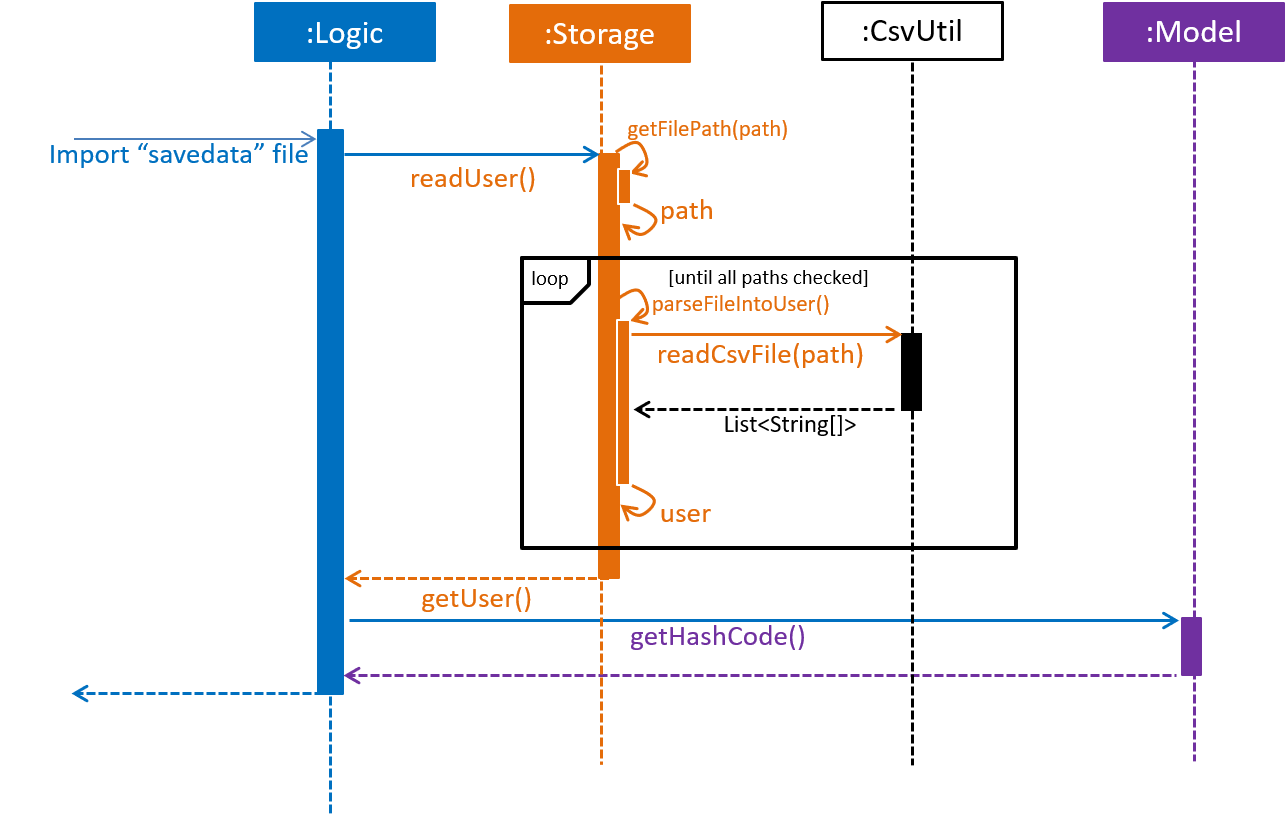
4.1.5. Sequence diagram for user storage
Below is a sequence diagram of how a file is parsed into BrainTrain
4.1.6. Code snippet
The following code snippet shows how the user data is obtained:
private Optional<CardSrsData> parseStringIntoCard(String[] cardArray) throws
            NumberFormatException, DateTimeParseException {

        for (int i = 0; i < cardArray.length - 1; i++) {
            if (cardArray[i].isEmpty()) {
                logger.warning("There are empty values in the file");
                return Optional.empty();
            }
        }

        try {
            hashCode = Integer.parseInt(cardArray[0]);
            numOfAttempts = Integer.parseInt(cardArray[1]);
            streak = Integer.parseInt(cardArray[2]);
            srs = Instant.parse(cardArray[3]);
            isDifficult = cardArray[4].equals("true");

            if (hashCode == ZERO) {
                logger.warning("Hashcode cannot be 0 in " + filePath.toString());
                return Optional.empty();
            }

        } catch (NumberFormatException e) {
            logger.warning("Values are not correct in " + filePath.toString());
            return Optional.empty();

        }

        card = new CardSrsData(hashCode, numOfAttempts, streak, srs, isDifficult);

        return Optional.of(card);
    }
4.1.7. Design considerations
-
Alternative 1 (Current choice): Automate importing/exporting when session is open/close
-
Pros: Lesser commands to manage.
-
Cons: Opening and closing may take up a lot of time if file is very big.
-
-
Alternative 2: Individual commands for user to toggle with to import and export files when desired
-
Pros: More control given to user
-
Cons: Accidental overwriting of files may occur. Furthermore, if users are not able to parse in values correctly, the file will not be saved. This is troublesome for users who are not tech-savvy.
-
4.2. Lesson storage feature
4.2.1. Current implementation
The lesson CSV storage feature implements the following functions:
-
Parsing lesson data into a list of string arrays, which is a format OpenCSV accepts for saving to CSV.
-
Parsing a list of string arrays back into lesson data, as retrieved from OpenCSV.
Actual file I/O is handled in the CsvUtil class, which uses the OpenCSV library to read/write .csv files.
4.2.2. Csv lesson format

reload command, an example of lesson loadingLessons are parsed by CsvLessonListStorage, being converted between Lesson and List<String[]> formats. The List<String[]> format is the primary format handled by CsvUtil for reading and writing to .csv files.
For lessons, there are three main sections when saved to a .csv file.
Name
A lesson’s name in BrainTrain is equivalent to its file name.
A lesson named "French" would be saved as "French.csv", and vice-versa.
Header
The header is represented in the file as the first two lines. Each line represents a specific set of data, as outlined below.
The first line represents the type of the corresponding column. Each column can have three types:
-
Tested
This marks the column as a core value. By default, the first two instances of Tested in the file will be tested in quiz mode. All remaining Tested values are treated as Not Tested. -
Not Tested
This marks the column as a core value. However, unlike Tested, they will not be tested in quiz mode. You can use thesetcommand to change this. -
Hint
This marks the column as a hint value. Hint values will appear when the user enters the\hintcommand in quiz mode. Values here are optional and can be left empty.
| Core values require every value in that column to be non-empty. This guarantees that the user will be tested on something, should they change which fields are tested. |
This is a code snippet from the parsing of the header data.
for (int i = 0; i < headerArray.length; i++) {
    if (headerArray[i].isEmpty()) {
        headerArray[i] = " ";
    }
}
int coreCount = 0;
int index = 0;
while (index < headerArray.length) {
    String headerChar = headerArray[index].toLowerCase().substring(0, 1);
    if (headerChar.equals(HEADER_CORE_QA)) {
        if (questionIndex == -1) {
            questionIndex = index;
        } else if (answerIndex == -1) {
            answerIndex = index;
        }
        coreCount++;
    } else if (headerChar.equals(HEADER_CORE_NOT_QA)) {
        coreCount++;
    } else if (!headerChar.equals(HEADER_OPTIONAL)) {
        return returnValues;
    }
    index++;
}
As seen at the beginning of the while loop, header values are actually treated as single case-insensitive characters. This means an experienced user may simply enter those letters as a shortcut.
The second line represents the name of each column as shown to the user. Any names left blank are automatically replaced with Unnamed.
Any discrepancies in the number of types and the number of names will result in the lesson not being loaded.
Card data
All remaining data is treated as card data. Any invalid data found in memory or from the file is skipped over.
Summary
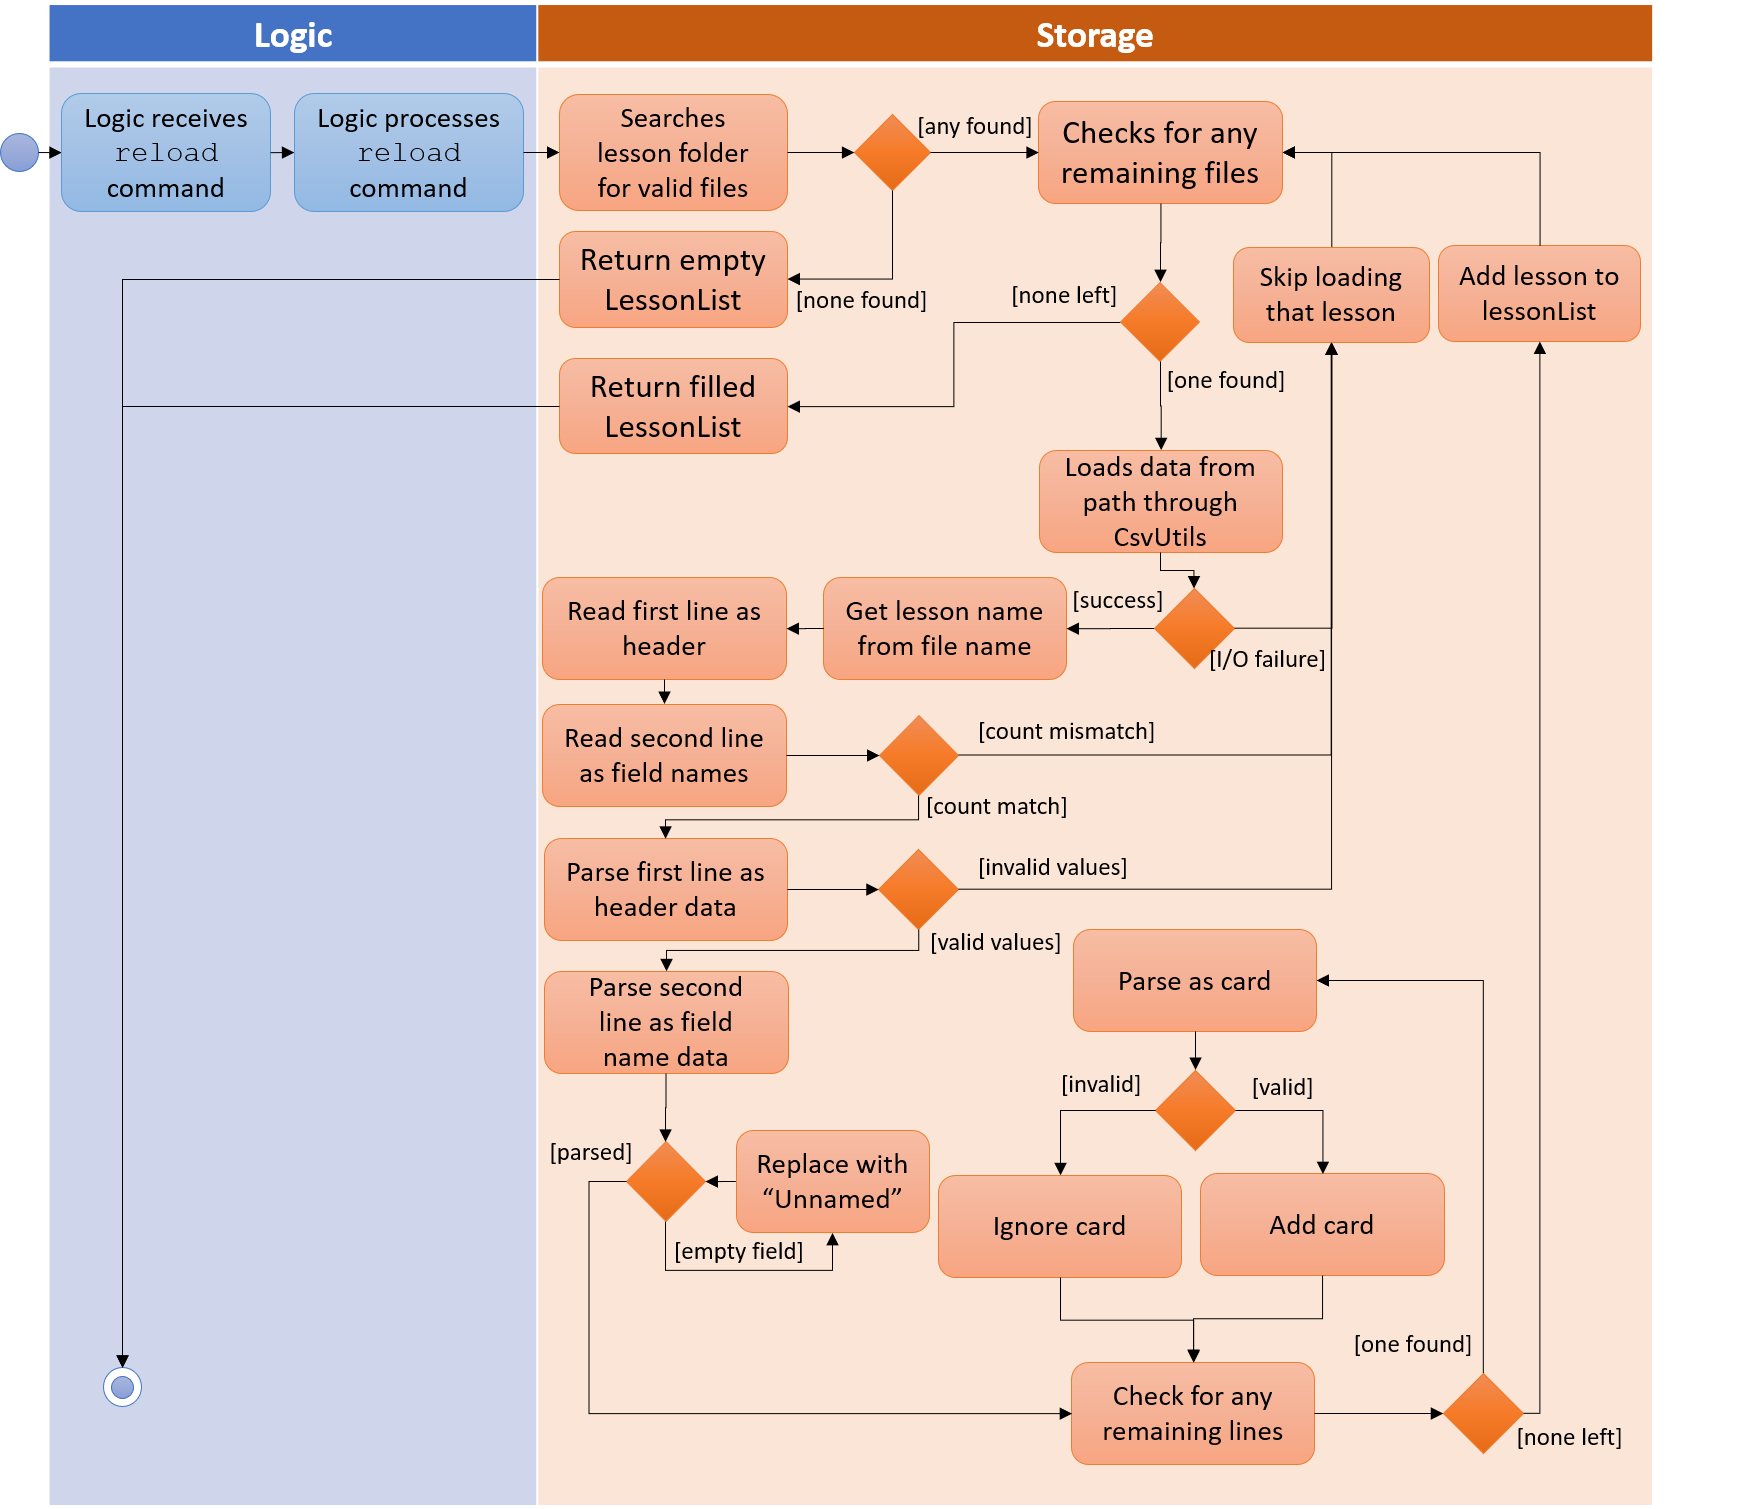
reload command, highlighting failure conditionsAs shown in the above diagram, data that is read in from a file goes through various checks before it is loaded into the application. Any invalid data is skipped over, with an entry in the logs explaining the cause of failure.
4.2.3. Design considerations
Aspect: choice of file type
-
Alternative 1 (current choice): Save as
.csv-
Pros: User is able to modify lesson data in a more advanced external spreadsheet tool like Excel
-
Cons: Lack of data verification within the file, JSON is already implemented in original code
-
-
Alternative 2: Save as JSON
-
Pros: All values can be verified through the file
-
Cons: Difficult for user to edit manually
-
Alternative 1 was chosen as ease of use is a high priority for the project. Most computer users are familiar with the Microsoft Office suite of applications, such as Word and Excel. As Excel allows .csv files to be shown in a spreadsheet, it was intended that users use Excel alongside BrainTrain for easy lesson management.
Aspect: handling of invalid data
-
Alternative 1 (current choice): Skip over specific lesson/card
-
Pros: User data is not automatically overwritten
-
Cons: User has to manually fix any issues with their data
-
-
Alternative 2: Automatically fix data
-
Pros: Ease of use for user
-
Cons: Automatic fix may not be as desired by user
-
Alternative 1 was chosen as creators are expected to have some skill in data editing. Normal users would ideally only download lessons from a creator, and would not be familiar enough with the lesson data to fix any issues.
4.3. Management feature
Management feature provides users with the ability to add, edit and delete lessons in Lesson View and Card View modes.
4.3.1. Lesson View
In Lesson View, users can:
-
addLesson- Adds a lesson to the list of lessons loaded in-memory. -
deleteLesson- Deletes a lesson from the list of lessons loaded in-memory. -
edit- Opens a lesson in Card View for editing -
listLessons- Lists all cards with full details
4.3.2. Card View
In Card View, users can:
-
addCard- Adds a card to the lesson opened in Card View. -
deleteCard- Deletes a card from the lesson opened in Card View. -
set- Sets the 2 test values to be tested in quiz mode for all cards in the lesson -
listCards- Lists all cards with full details -
quit- Quits Card View and returns to Lesson View
In the subsequent sub-sections, I will discuss the 3 major model classes used to manage lessons and flashcards, Card.java, Lesson.java, and LessonList.java. These classes are also used by the Lesson Storage Feature and Session Feature.
4.3.3. Card class
An instance of Card.java represents a flashcard which contains 2 or more test values and 0 or more hint values. It takes in a list of test values, and optionally a list of hint values.
The following code shows how the card is generated:
|
Test and hint values are referred to as core and optional values internally. These terms are interchangeable. |
/**
  * Creates a {@code Card} which represents a flash card.
  *
  * @param cores {@link #cores} a {@code Card} must have.
  * @param optionals {@link #optionals} a {@code Card} can have.
  */
 public Card(List<String> cores, List<String> optionals) {
     requireAllNonNull(cores, optionals);
     this.cores = new ArrayList<>();
     this.cores.addAll(cores);
     this.optionals = new ArrayList<>();
     this.optionals.addAll(optionals);
     hashCode = generateHashCode();
 }

 /**
  * Creates a {@code Card} which represents a flash card.
  *
  * @param cores {@link #cores} a {@code Card} must have.
  */
 public Card(List<String> cores) {
     // Generates a Card without optionals.
 }
These 2 constructors are called by the Lesson.java which generates a list of cards.
4.3.4. Lesson class
An instance of Lesson.java represents a lesson which contains multiple flashcards of the same type and topic. This lesson can be loaded into quiz mode for testing.
The following code shows how cards are generated by the lesson:
/**
 * Adds a {@link Card} object to the lesson.
 * {@code fields} are separated into two separate sub-lists of cores and optionals based on
 * {@link #coreHeaders}'s {@code size()}.
 *
 * @param fields the {@link Card}'s cores and optionals in this order
 */
public void addCard(List<String> fields) {
    requireAllNonNull(fields);
    if (fields.size() == coreHeaders.size()) {
        addCard(new Card(fields));
    } else {
        List<String> cores = fields.subList(0, coreHeaders.size());
        int optionalStart = coreHeaders.size();
        int optionalEnd = fields.size();
        List<String> optionals = fields.subList(optionalStart, optionalEnd);
        addCard(new Card(cores, optionals));
    }
}

/**
 * Adds {@link Card} objects to the lesson.
 *
 * @param cards a list of {@link Card} objects to be added to the lesson
 */
public void addCards(List<Card> cards) {
    for (Card card: cards) {
        addCard(card);
    }
}
The addCards(List<Card> cards) method is called by the LessonList.java which generates a list of lessons.
4.3.5. LessonList class
An instance of LessonList.java represents a list of lessons. It has helper functions to assist with the management of lessons.
The following code shows how the Main, Storage, Logic, and ManagementModel key components use the LessonList.java class.
Usage by the Main and Storage key components
When the Main component loads upon app launch, it triggers the Storage component which loads lessons from the hard disk into memory by calling the LessonList() constructor, the addLesson(Lesson lesson) and other methods.
/**
 * Creates a new {@link LessonList} which is used to store a list of {@link Lesson} objects.
 */
public LessonList() {
    lessons = new ArrayList<>();
}

/**
 * Adds a {@link Lesson} object to {@link #lessons}.
 *
 * @param lesson {@link Lesson} to be added to {@link #lessons}
 */
public void addLesson(Lesson lesson) {
    requireNonNull(lesson);
    lessons.add(lesson);
}
Usage by the Logic and ManagementModel key components
When the Logic component parses an addCard command, it triggers the ManagementModel component to use the addCardToOpenedLesson(Card card) to add a card to the lesson opened for editing in Card View.
/**
 * Adds a {@link Card} to the {@link #openedLesson}.
 *
 * @param card {@link Card} to be added to the {@link #openedLesson}
 */
public void addCardToOpenedLesson(Card card) {
    requireAllNonNull(openedLesson, card);
    openedLesson.addCard(card);
}
4.3.6. Add card command: addCard
The addCard command adds a card to the lesson which is being edited in Card View.
For example:
-
Given a lesson on country capitals which has 2 test values, 'Country' and 'Capital', and 1 hint value, 'Hint'.
-
If a user wants to add a flashcard to this lesson, he would enter
addCard t/Korea t/Seoul h/S.
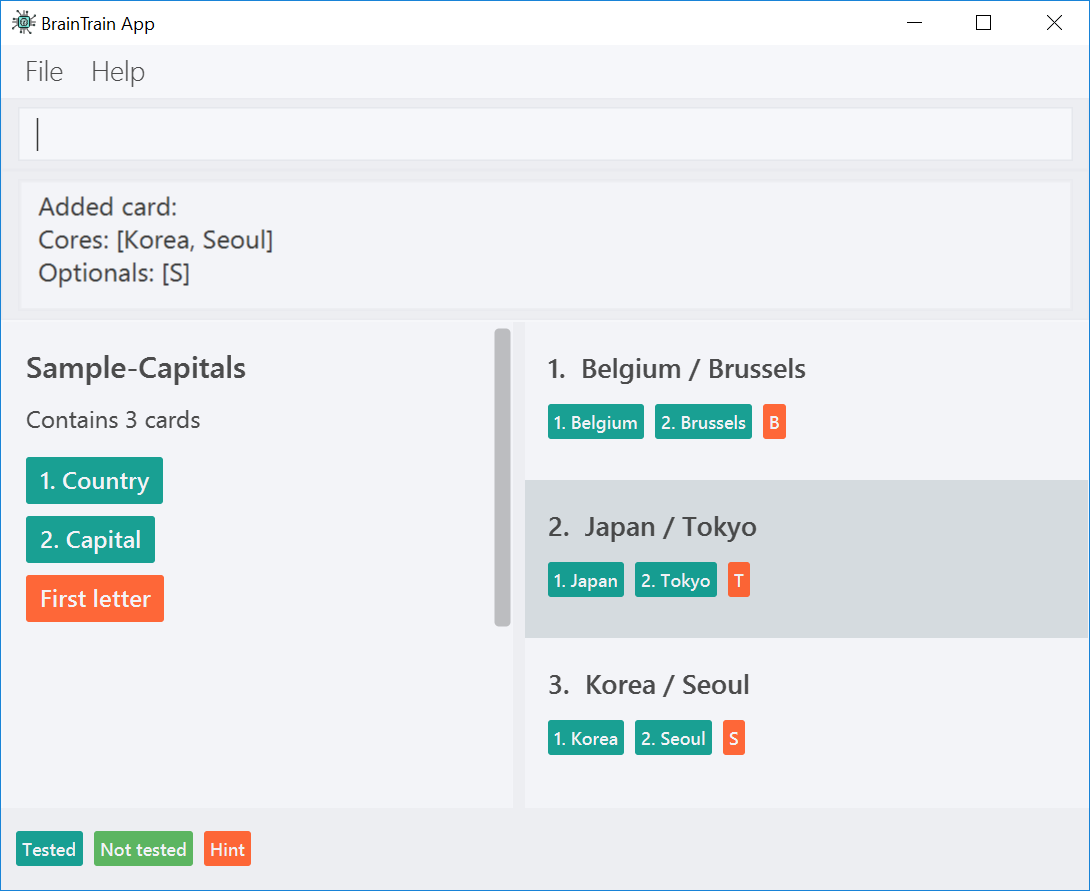
How it will look like to the user after entering the command:
Given the above example, the following sequence of interactions will occur within the Logic component.
addCard t/Korea t/Seoul h/S command4.3.7. Design consideration
Aspect: contextual management commands
-
Alternative 1 (current choice): Only lesson-related commands are allowed in Lesson View sub-management mode, and only card-related commands are allowed in Card View sub-management mode.
-
Pros: The user need not specify which lesson he is adding or deleting cards from. It is clear which lesson is currently being edited.
-
Con: Tedious to implement given that it requries significant refactoring of the base code provided.
-
-
Alternative 2: A single management mode where all lesson and card-related commands can be executed.
-
Pro: This is significantly easier to implement give that no major refactoring is requred.
-
Con: This compromises the user experience.
-
Alternative 1 was chosen because it will vastly improve the user experience. For example, if a user were to need to add multiple cards to a specific lesson, alternative 2 would require the user to enter the lesson’s index or name for each addCard command (e.g. addCard n/Sample-Capitals t/Korea t/Seoul where 'Sample-Capitals' is the lesson’s name).
On the other hand, alternative 1 only requires the user to open the lesson for editing in Card View once, before calling the addCard commands. These addCard commands will not require the user to specify which lesson to add the cards to.
Hence by choosing alternative 1, the user experience was vastly improved given that the user interface is easier to use.
4.4. Session feature
Session feature generates cards for users in quiz session based on their requirement.
4.4.1. Current implementation
Session feature implements the following functions and commands:
-
Combining data from lesson and user storage together.
-
SrsCardManager:
-
Generating a list of cards for quiz based on different modes and SRS (Space-Repetition technique) method.
-
Updating user data after quiz ends.
-
-
start- An input with lesson index, count of cards and mode parameters.
4.4.2. SRS method
The SRS method allows users to be tested with the most urgent questions. The method gives each card a srsDueDate field which contains
an instant value representing the deadline of testing this card again.
-
The SRS method updates users profile using Leitner_system.
-
There are several levels in the Leitner_system. The lower the level is, the more urgent the card is. When the user answers correctly, the level of that card will increase by one. Otherwise it will decrease by one.
-
User data will be updated based on their performance in quiz session. Generally speaking, if the user answer correctly, the
srsDueDateof the current card will be carry-forwarded.
-
4.4.3. SrsCardManager
The SrsCardManager generates needed list of QuizCard when the user wants to start a quiz. This class includes four methods for four different modes correspondingly as shown below.
-
Difficult mode:
previewDifficult() -
Preview mode:
preview() -
Learn mode:
learn() -
Review mode:
sort()
The following activity diagram summarizes what happens when the user executes a new StartCommand.
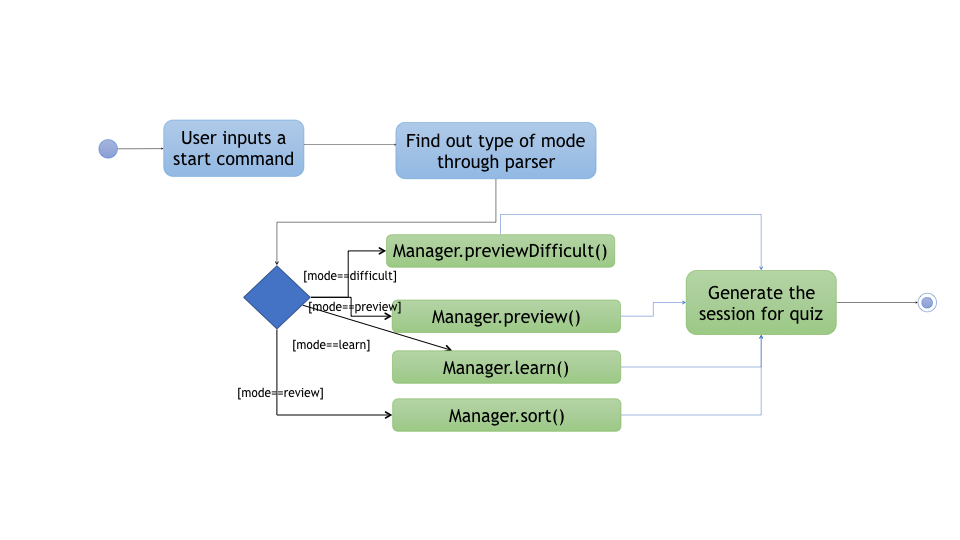
|
Space-Repetition technique is only applied in review mode. |
The SrsCardManager also updates user data using UpdateCardData() after receiving results from Quiz.
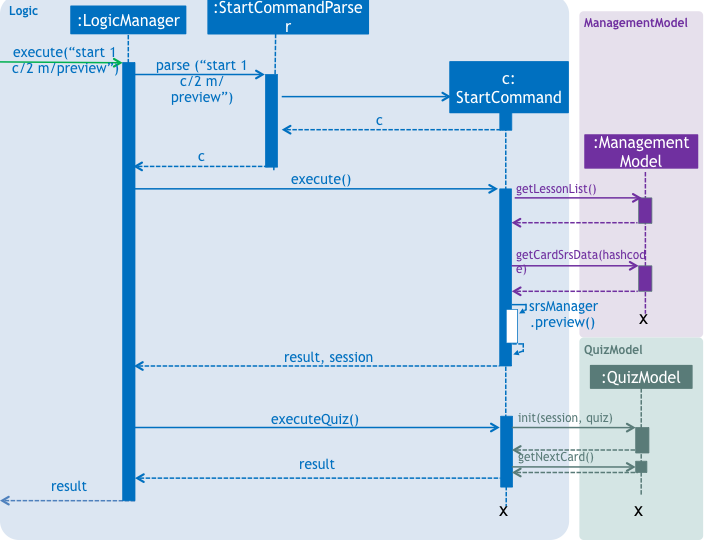
4.4.4. Management start command: start
The start command starts a quiz session based on input parameters. It will analyze the current storage information and then generate the list of QuizCard using SrsCardManager. It will test the 2 values set to be tested for the lesson. The generating rules are different for different QuizMode as explained in a subsequent section. Once the start command have succeeded running, the system will switch to the quiz mode.
The start command needs users to specify LessonIndex, CardCount and QuizMode parameter.
The following sequence diagram shows the interaction between the various classes when the user starts a sample quiz:
4.4.5. Design consideration
Aspect: SRS method for updating
-
Alternative 1: Leinter System (current choice)
-
Pros: Efficient in calculation and easy to understand.
-
Cons: The time interval between levels cannot be long.
-
-
Alternative 2: Pimsleur’s graduated-interval recall
-
Pros: Short time interval between the first few repetitions.
-
Cons: No level attribute to group the element clearly.
-
-
Alternative 1 was chosen because it clearly displays the due date in several levels. Developers can also understand it easily since the actions for updating is simple. Besides, the system does not require the testing interval of the same card to be very small.
Aspect: data storage to support the SRS system
-
Alternative 1: The system saves the due time into several levels and stores in a hashmap with card’s hashcode (current choice)
-
Pros: It is easier to update the user progress using Leinter System since the levels are already stored.
-
Cons: The system needs to generate the range of due time for each level by default and the range may be unreasonable.
-
-
Alternative 2: The system saves the due time and hashcode of cards directly in a 2D array
-
Pros: It is clearer to see the match between card and its due time with same hashcode.
-
Cons: It is more difficult to set the updated due time for each single card.
-
-
Alternative 1 was chosen because the quiz only passes back information of total attempts and total number of correct answers. It is hard to generate an algorithm to update due time for each single card with only these quiz information. Thus, grouping cards as different levels and updating due time under different levels can solve this problem more efficiently.
Aspect: review mode
-
Alternative 1: Starts test directly (current choice)
-
Pros: Users can focus on the tests directly.
-
Cons: No time for them to have a quick reminder.
-
-
Alternative 2: Starts with previewing questions and answers
-
Pros: Users can recall the cards before testing.
-
Cons: The difficulty level becomes lower.
-
-
Alternative 1 was chosen because users are supposed to enter the test directly when they are reviewing cards. They can then judge their memorizing results in a most accurate level.
4.5. Quiz feature
Quiz feature allows users to enter quiz related commands and answer.
4.5.1. Current implementation
The quiz feature processes the following inputs:
-
[ANSWER]…- An input without a prefix\is treated as an answer. -
\difficult- Labels current question as difficult or not. -
\help- Lists all quiz commands and inputs which will be accepted. -
\hint- Reveals additional information to help the user to answer the question. -
\quit- Quits quiz mode and saves attempt progress. -
\status- Lists current quiz progress.
4.5.2. Quiz class
Quiz.java holds all the in-memory
quiz data. It takes in a list of cards from Session. Then, it generates an expanded list of cards based on the mode indicated by the user. The generated list of cards in both
review and learn mode includes cards which questions and answers are flipped. This to ensure that users are
memorizing both question and answer values. According to the mode which the user has chosen, the cards will be
displayed differently as seen below.
In the four different modes:
-
Preview: both the question and answer are shown to the user.
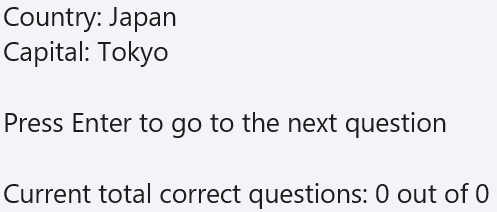
preview mode.-
Review: only the question is shown as the user needs to answer the question.

review mode.-
Learn: is a combination of preview and review, the user sees both the question and answer as in
previewmode, before attempting the question with the answer hidden as inreviewmode.

learn mode.-
Difficult: similar to preview mode but only contains questions which have been labelled as difficult.
The following code shows how the cards are generated:
private List<QuizCard> generate() {
    generatedQuizCardList = new ArrayList<>();

    switch (mode) {
    case PREVIEW:
        generatePreview();
        break;
    case LEARN:
        // Learn is a combination of preview + review
        generatePreview();
        generateReview();
        break;
    case REVIEW:
        generateReview();
        break;
    case DIFFICULT:
        generatePreview();
        break;
    default:
        break;
    }

    generatedCardSize = generatedQuizCardList.size();
    return generatedQuizCardList;
}

private void generateReview() {
    QuizCard currentCard;
    for (int i = 0; i < originalQuizCardList.size(); i++) {
        currentCard = originalQuizCardList.get(i);
        generatedQuizCardList.add(
            currentCard.generateOrderedQuizCardWithIndex(i, QuizMode.REVIEW));
    }

    for (int i = 0; i < originalQuizCardList.size(); i++) {
        currentCard = originalQuizCardList.get(i);
        generatedQuizCardList.add(
            currentCard.generateFlippedQuizCardWithIndex(i));
    }
}

private void generatePreview() {
    QuizCard currentCard;

    for (int i = 0; i < originalQuizCardList.size(); i++) {
        currentCard = originalQuizCardList.get(i);
        generatedQuizCardList.add(
            currentCard.generateOrderedQuizCardWithIndex(i, QuizMode.PREVIEW));
    }
}
4.5.3. Quiz answer command: [ANSWER]
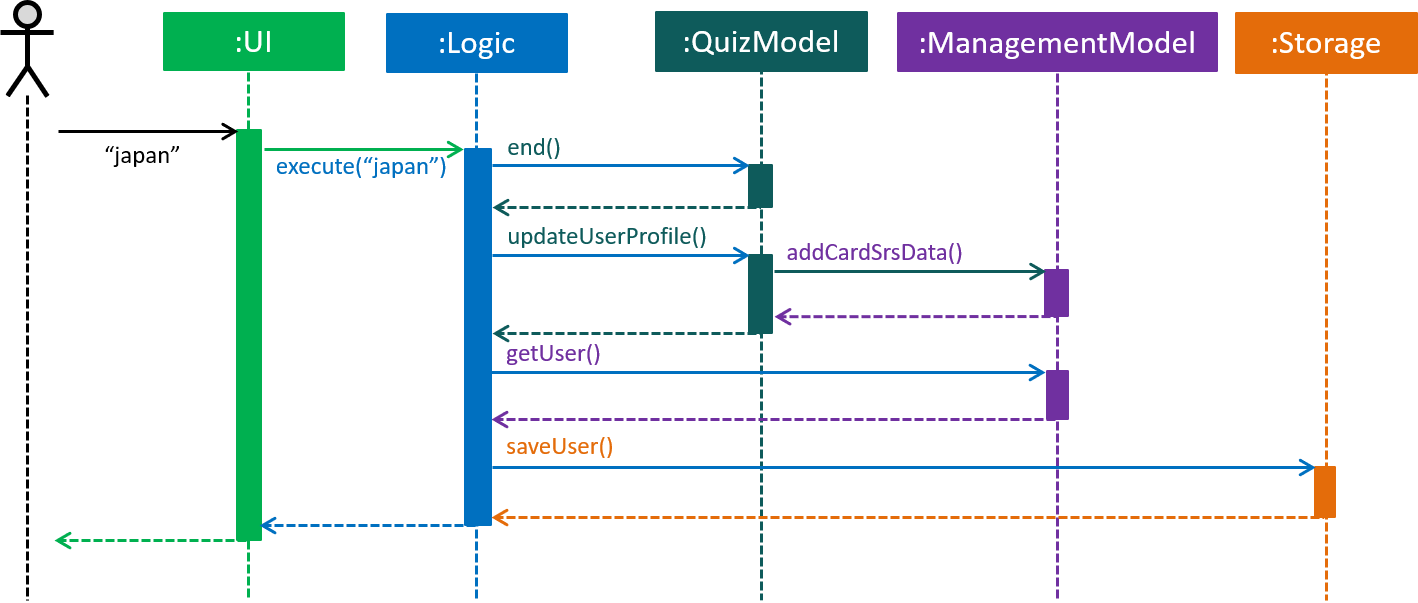
ANSWER command, an example of completing a quiz.The [ANSWER] feature is facilitated by QuizAnswerCommand. The command takes in user input
as answer, which will be processed later when the command is executed.
The following sequence diagram shows the interaction between the various classes when the user answered the question correctly:
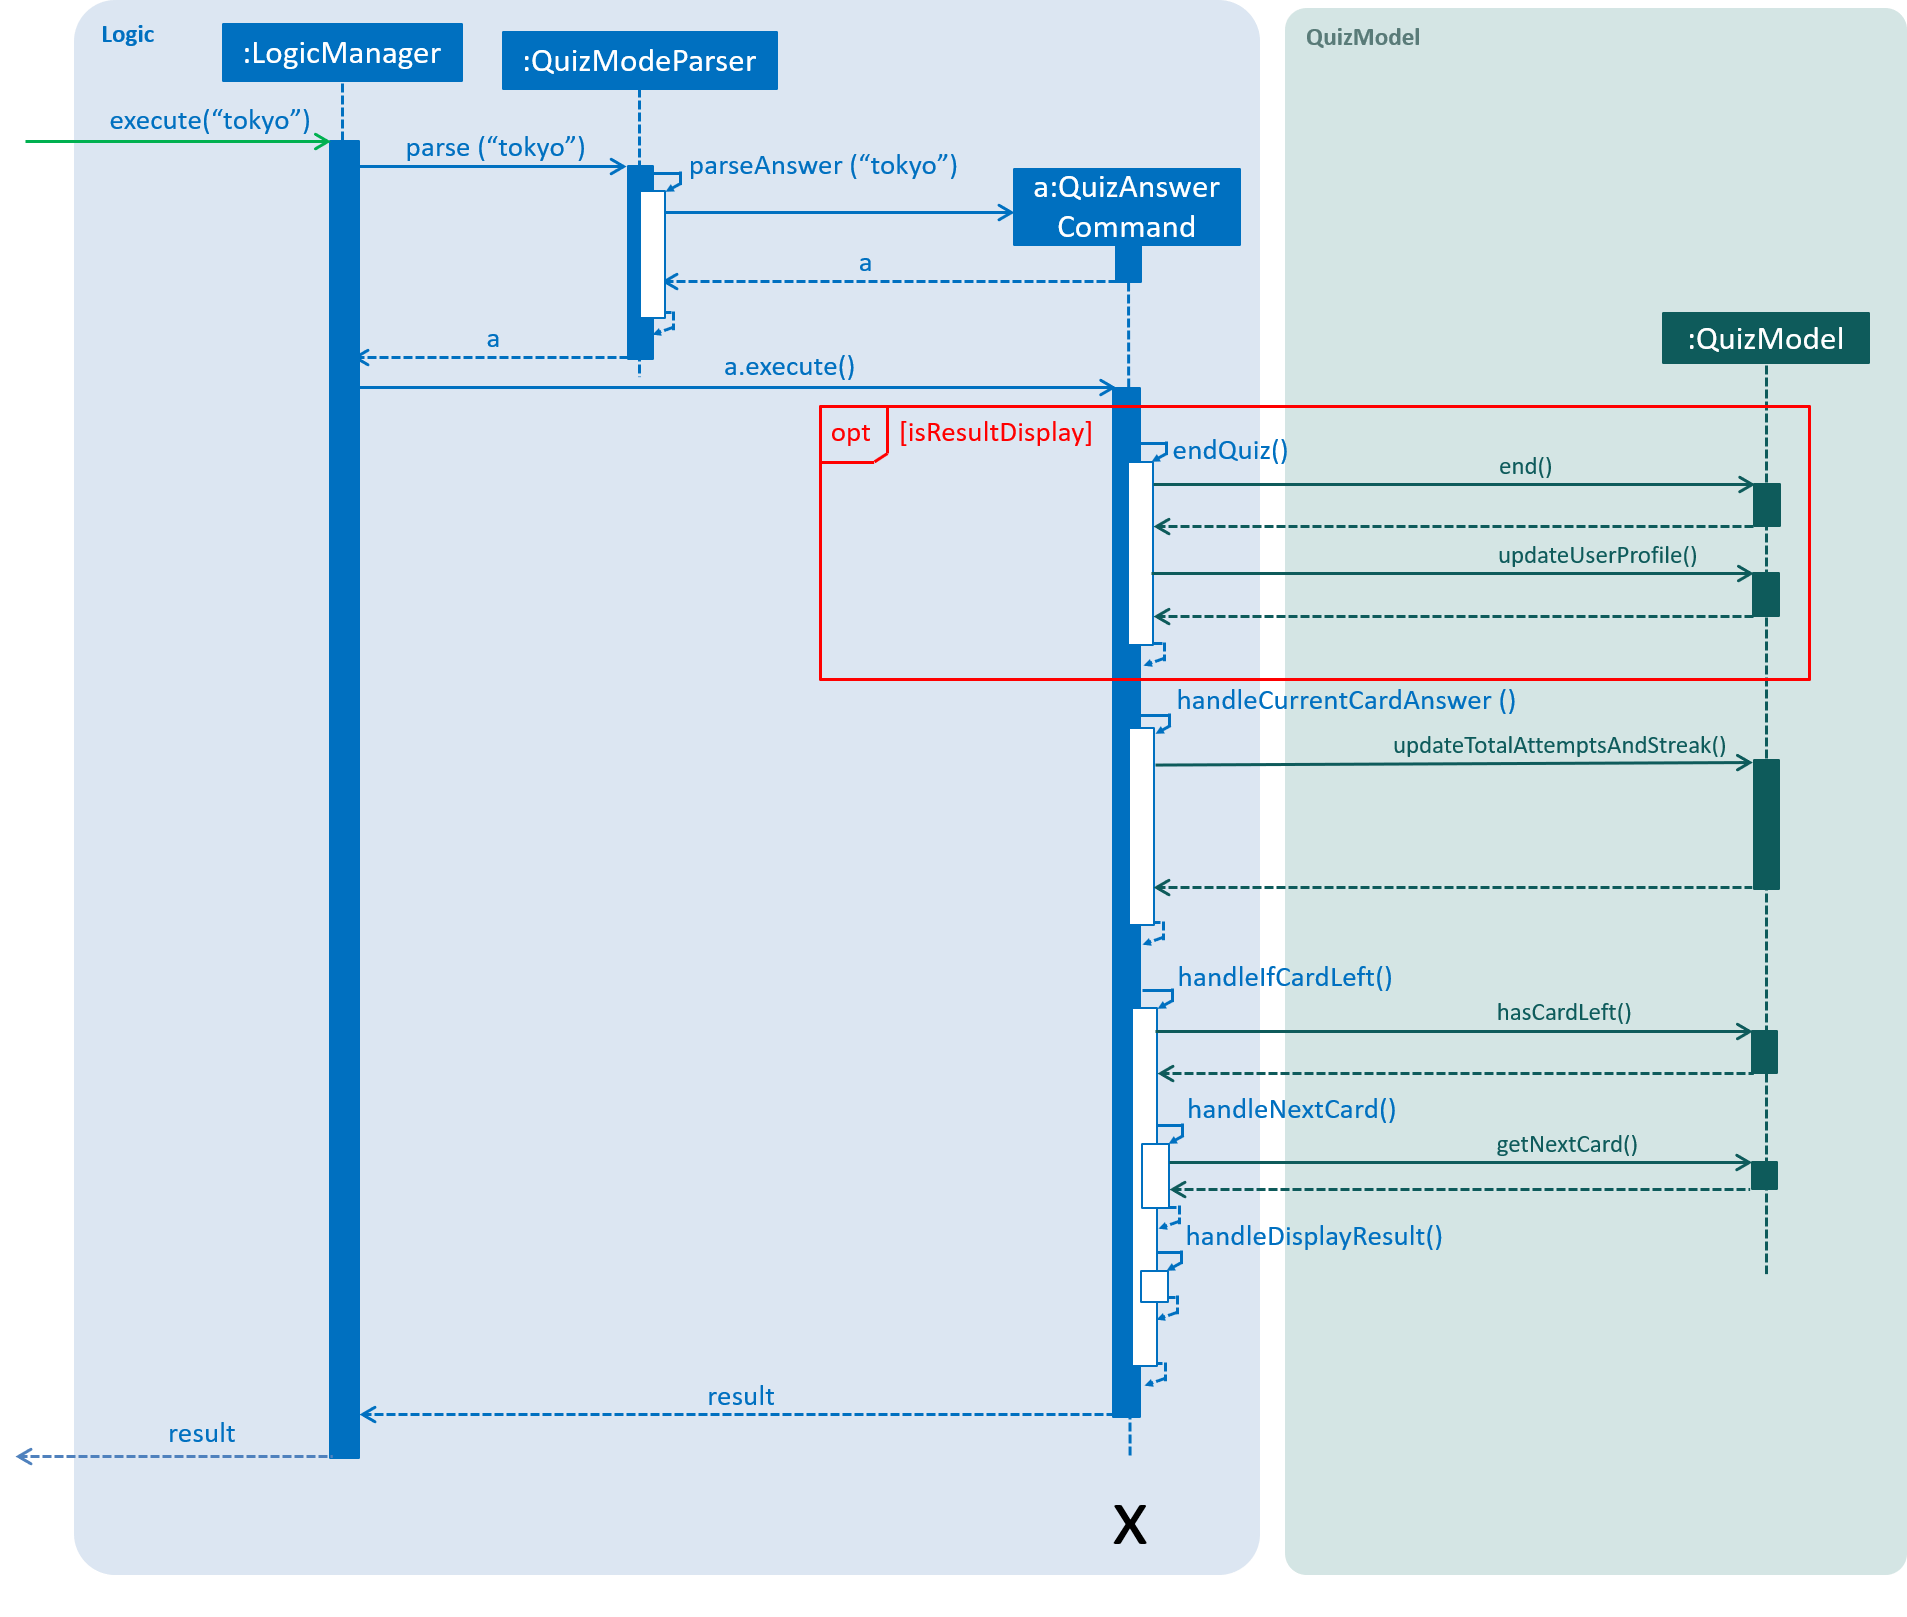
In the execute method of the QuizAnswerCommand, the following steps can be performed:
-
Quiz result
This step checks if the user is shown the result, this is performed because the quiz can only end after the result has been shown. Once the quiz ends, BrainTrain will save the progress of the quiz to the file specified by the user. -
Handling of answer
This step checks if the answer should be handled, if user is inPREVIEWmode it will not be handled. Otherwise, the total attempts and streak of the question will be updated depending on whether the question has been answered correctly. -
Handling of next question
This step verifies that the question has been answered correctly, and checks if there are still questions left for the current quiz. Depending on the check, it will then displays the next question or the quiz result.
The following code shows how the steps could be performed:
public CommandResult execute(Model model, CommandHistory history) throws CommandException {
requireNonNull(model);
this.quizModel = requireQuizModel(model);
this.card = quizModel.getCurrentQuizCard();
this.isCurrentCardWrong = false;
StringBuilder sb = new StringBuilder();
if (quizModel.isResultDisplay()) {
endQuiz();
return new CommandResult("", true, false, false);
}
if (card.isWrongTwice() || card.getQuizMode() != QuizMode.PREVIEW) {
sb.append(handleCurrentCardAnswer());
}
if (!isCurrentCardWrong) {
String result = handleIfCardLeft();
sb.append(result);
}
return new CommandResult(sb.toString(), true, false, false);
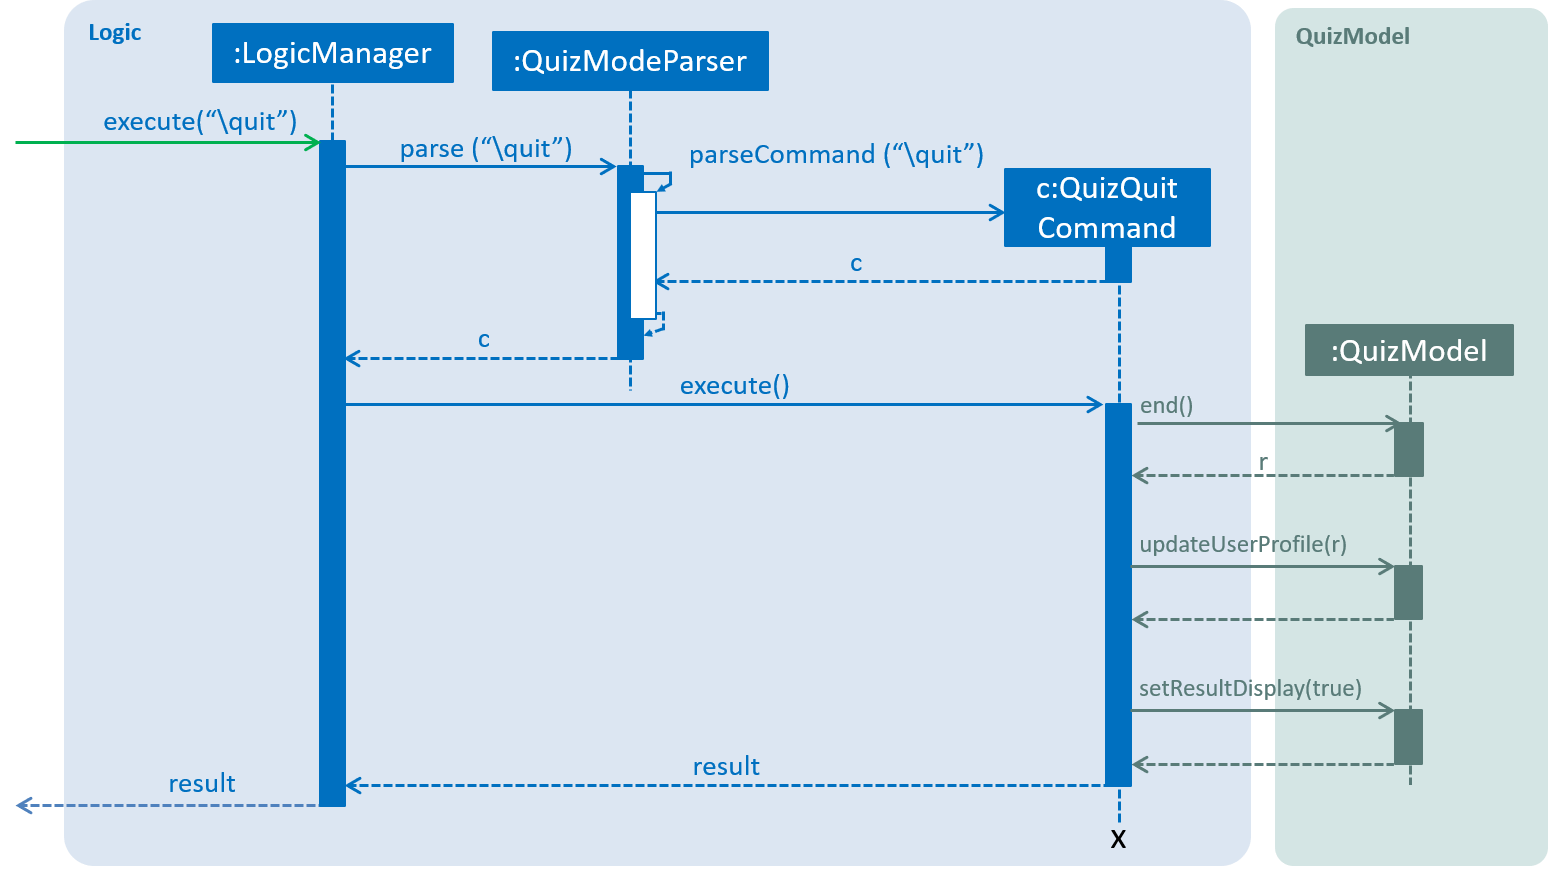
}4.5.4. Quiz quit command: \quit
The \quit will force quit the current quiz and save the attempted questions to the location which
the user has specified in UserPref. By default it will be saved to \userdata\savedata.csv. Once
the \quit command is completed, the user will be returned to the management mode.
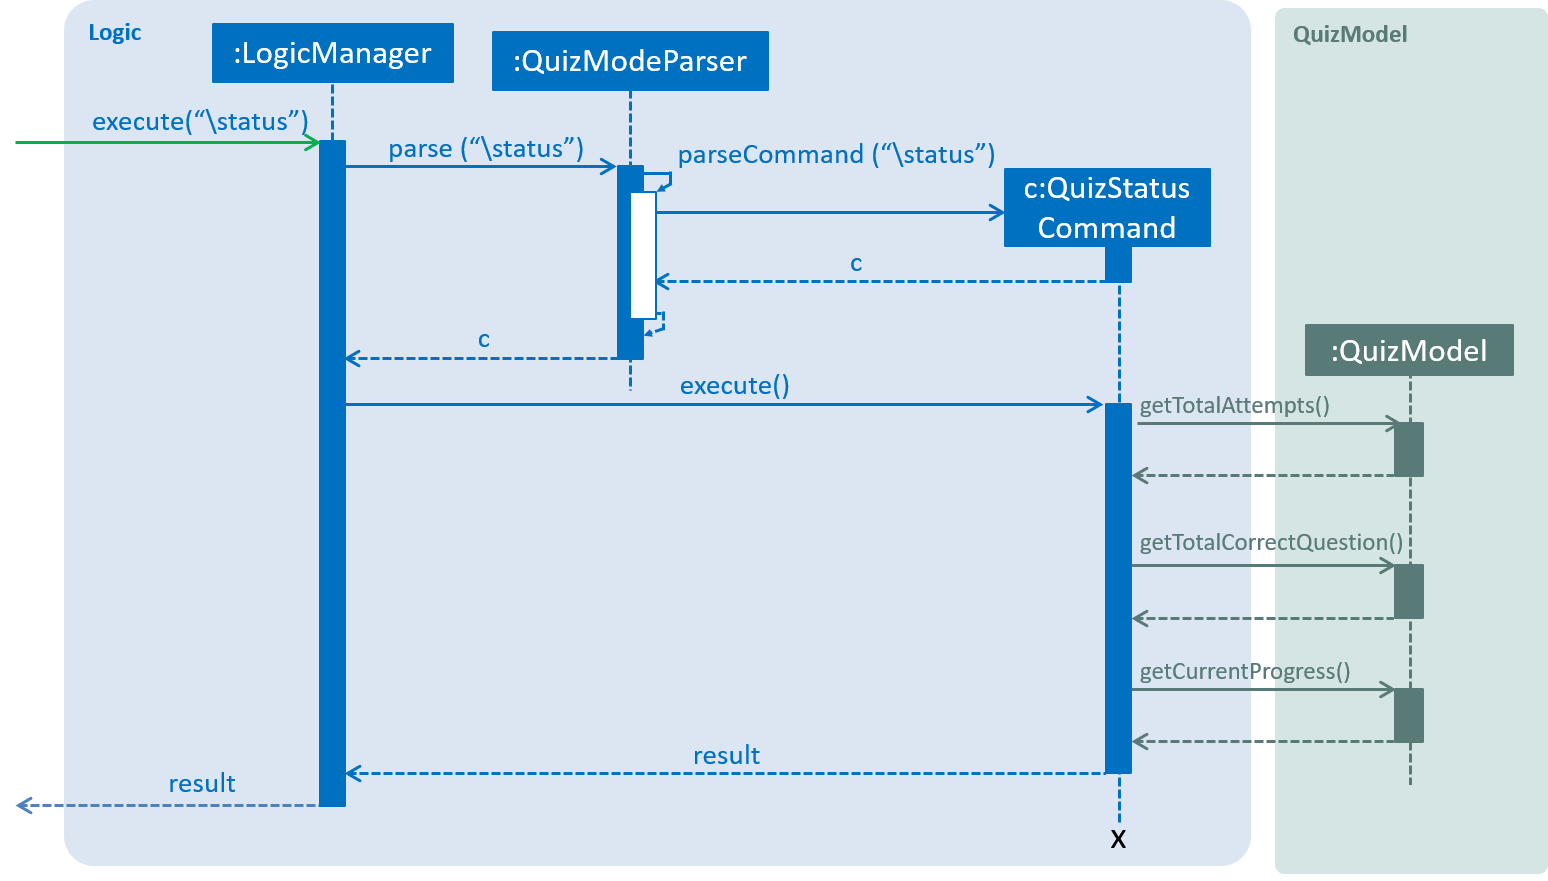
4.5.5. Quiz status command: \status
The \status feature lists the total number of attempts you have made, total number of
question you have gotten correct, and which question you are currently on.
4.5.6. Design considerations
Aspect: quiz and management commands execution
-
Alternative 1 (current choice): Run quiz in a different mode
-
Pro: Least restricted choice of answer and great user experience.
-
Con: Tedious to implement.
-
-
Alternative 2: Run quiz together with the rest of the commands
-
Pro: Easy to implement.
-
Con: Restricted answer and compromised user experience. Answer cannot start with words already reserved for management commands. (e.g.
start)
-
Alternative 1 is chosen because it allows the user to have a more flexible choice of word. For certain questions, it is possible for the answer to be "start". Hence by choosing alternative 1, the choice of answer will not be restricted. Also, by running the quiz in a different mode, it allows the user to have intuitive interaction in quiz mode.
4.6. Logging
We are using java.util.logging package for logging. The LogsCenter class is used to manage the logging levels and logging destinations.
-
The logging level can be controlled using the
logLevelsetting in the configuration file (See Section 4.7, “Configuration
”) -
The
Loggerfor a class can be obtained usingLogsCenter.getLogger(Class)which will log messages according to the specified logging level -
Currently log messages are output through:
Consoleand to a.logfile.
Logging Levels
-
SEVERE: Critical problem detected which may possibly cause the termination of the application -
WARNING: Can continue, but with caution -
INFO: Information showing the noteworthy actions by the app -
FINE: Details that is not usually noteworthy but may be useful in debugging e.g. print the actual list instead of just its size
4.7. Configuration
Certain properties of the application can be controlled (e.g user prefs file location, logging level) through the configuration file (default: config.json).
5. Documentation
We used AsciiDoc for writing documentation.
| We chose AsciiDoc over Markdown because AsciiDoc, although a bit more complex than Markdown, provides more flexibility in formatting. |
5.1. Editing documentation
See UsingGradle.adoc to learn how to render .adoc files locally to preview the end result of your edits.
Alternatively, you can download the AsciiDoc plugin for IntelliJ, which allows you to preview the changes you have made to your .adoc files in real-time.
5.2. Publishing documentation
See UsingTravis.adoc to learn how to deploy GitHub Pages using Travis.
5.3. Converting documentation to PDF format
We use Google Chrome for converting documentation to PDF format, as Chrome’s PDF engine preserves hyperlinks used in webpages.
Here are the steps to convert the project documentation files to PDF format.
-
Follow the instructions in UsingGradle.adoc to convert the AsciiDoc files in the
docs/directory to HTML format. -
Go to your generated HTML files in the
build/docsfolder, right click on them and selectOpen with→Google Chrome. -
Within Chrome, click on the
Printoption in Chrome’s menu. -
Set the destination to
Save as PDF, then clickSaveto save a copy of the file in PDF format. For best results, use the settings indicated in the screenshot below.
5.4. Site-wide documentation settings
The build.gradle file specifies some project-specific AsciiDoc attributes which affects how all documentation files within this project are rendered.
Attributes left unset in the build.gradle file will use their default value, if any.
|
| Attribute name | Description | Default value |
|---|---|---|
|
The name of the website. If set, the name will be displayed near the top of the page. |
not set |
|
URL to the site’s repository on GitHub. Setting this will add a "View on GitHub" link in the navigation bar. |
not set |
|
Define this attribute if the project is an official SE-EDU project. This will render the SE-EDU navigation bar at the top of the page, and add some SE-EDU-specific navigation items. |
not set |
5.5. Per-file documentation settings
Each .adoc file may also specify some file-specific asciidoc attributes which affects how the file is rendered.
Asciidoctor’s built-in attributes may be specified and used as well.
Attributes left unset in .adoc files will use their default value, if any.
|
| Attribute name | Description | Default value |
|---|---|---|
|
Site section that the document belongs to.
This will cause the associated item in the navigation bar to be highlighted.
One of: * Official SE-EDU projects only |
not set |
|
Set this attribute to remove the site navigation bar. |
not set |
5.6. Site template
The files in docs/stylesheets are the CSS stylesheets of the site.
You can modify them to change some properties of the site’s design.
The files in docs/templates controls the rendering of .adoc files into HTML5.
These template files are written in a mixture of Ruby and Slim.
|
Modifying the template files in |
6. Testing
6.1. Running tests
There are three ways to run tests.
| The most reliable way to run tests is the 3rd one. The first two methods might fail some GUI tests due to platform/resolution-specific idiosyncrasies. |
Method 1: Using IntelliJ JUnit test runner
-
To run all tests, right-click on the
src/test/javafolder and chooseRun 'All Tests' -
To run a subset of tests, you can right-click on a test package, test class, or a test and choose
Run 'ABC'
Method 2: Using Gradle
-
Open a console and run the command
gradlew clean allTests(Mac/Linux:./gradlew clean allTests)
| See UsingGradle.adoc for more info on how to run tests using Gradle. |
Method 3: Using Gradle (headless)
Thanks to the TestFX library we use, our GUI tests can be run in the headless mode. In the headless mode, GUI tests do not show up on the screen. That means the developer can do other things on the Computer while the tests are running.
To run tests in headless mode, open a console and run the command gradlew clean headless allTests (Mac/Linux: ./gradlew clean headless allTests)
6.2. Types of tests
We have two types of tests:
-
GUI Tests - These are tests involving the GUI. They include,
-
System Tests that test the entire app by simulating user actions on the GUI. These are in the
systemtestspackage. -
Unit tests that test the individual components. These are in
seedu.address.uipackage.
-
-
Non-GUI Tests - These are tests not involving the GUI. They include,
-
Unit tests targeting the lowest level methods/classes.
e.g.seedu.address.commons.StringUtilTest -
Integration tests that are checking the integration of multiple code units (those code units are assumed to be working).
e.g.seedu.address.storage.StorageManagerTest -
Hybrids of unit and integration tests. These test are checking multiple code units as well as how the are connected together.
e.g.seedu.address.logic.LogicManagerTest
-
6.3. Troubleshooting testing
Problem: HelpWindowTest fails with a NullPointerException.
-
Reason: One of its dependencies,
HelpWindow.htmlinsrc/main/resources/docsis missing. -
Solution: Execute Gradle task
processResources.
7. Dev ops
7.1. Build automation
See UsingGradle.adoc to learn how to use Gradle for build automation.
7.2. Continuous integration
We use Travis CI and AppVeyor to perform Continuous Integration on our projects. See UsingTravis.adoc and UsingAppVeyor.adoc for more details.
7.3. Coverage reporting
We use Coveralls to track the code coverage of our projects. See UsingCoveralls.adoc for more details.
7.4. Documentation previews
When a pull request has changes to AsciiDoc files, you can use Netlify to see a preview of how the HTML version of those AsciiDoc files will look like when the pull request is merged. See UsingNetlify.adoc for more details.
7.5. Making a release
Here are the steps to create a new release.
-
Update the version number in
MainApp.java. -
Generate a JAR file using Gradle.
-
Tag the repo with the version number. e.g.
v0.1 -
Create a new release using GitHub and upload the JAR file you created.
7.6. Managing dependencies
A project often depends on third-party libraries. For example, Address Book depends on the Jackson library for JSON parsing. Managing these dependencies can be automated using Gradle. For example, Gradle can download the dependencies automatically, which is better than these alternatives:
-
Include those libraries in the repo (this bloats the repo size)
-
Require developers to download those libraries manually (this creates extra work for developers)
Appendix A: Product scope
Target user profile:
-
student who is trying to remember something content heavy for a given subject
-
would like a flashcard system that introduces/tests them on words/ideas
-
prefers command line interface for simplicity
-
able to keep track of the progress of all lessons
Possible users:
-
User / Student: Someone who’s trying to memorise content
-
Creator / Educator: Someone who generates the lists of content so that other users (i.e Student) can use it directly without having to do the data entry
Value proposition: Flashcard integrated with SRS that assists in memorization
Appendix B: User stories
Priorities: High (must have) - * * *, Medium (nice to have) - * *, Low (unlikely to have) - *
| Priority | As a … | I want to … | So that… |
|---|---|---|---|
|
new user |
see usage instructions |
I can refer to instructions when I forget how to use the app |
|
user |
load/import lessons |
I can use the app without needing to make my own lists first |
|
Creator |
export lessons |
I can share my lessons easily in a multiple files |
|
user |
be tested more often on poorly memorized questions |
I can automatically focus on them |
|
user |
save my current progress |
I do not lose progress between sessions |
|
user |
export my current progress |
I can keep my progress between different devices |
|
user |
reset my progress |
I can start anew |
|
user |
see my current progress |
I know which questions I frequently get it right or wrong |
|
user |
be give multiple chances to answer |
I am given some leeway for mistyping |
|
user |
start a lesson |
I can start to memorise |
|
user |
see a hint if I am not sure about the answer |
I can have a deeper impression |
|
user |
exit a quit any time |
I can save my progress and continue next time. |
|
user |
view correct answer and explanation if I answered wrongly |
I can understand and remember it better |
|
user |
view the cards from the lesson at a glance |
I can manage the lesson’s cards easily |
|
user |
view all the lessons at a glance |
I can easily manage the lessons easily |
|
Creator |
change the testable values |
I can choose which values to tested. |
|
user |
add tags to the lessons |
I can search based on the tags |
|
user |
start multiple lessons |
I can see all the question at once |
|
user |
limit how many questions I’m given at one go |
I can have shorter/longer sessions |
|
user |
store/favourite hard content |
I can review them more frequently |
|
user |
have my own profile |
Others can use the program on the same device |
|
user |
use any language |
I can use it for languages other than English |
|
user |
have a graded test based on my current progress |
I can see clearly how well I obtain the knowledge |
|
user |
view lessons created by others |
I can import them into my own library without creating my own |
|
user |
change the frequency of re-testing |
I can test everything on my own basis |
|
user |
switch question and answer |
I can associate the answer and question the other way. |
|
user |
change the number of possible answers |
I can vary the difficulty level |
|
user |
have images as prompts |
I have more varied test options |
|
user |
set the plan (like 15 words a day) |
I can make sure that I’m on track |
|
user |
autocomplete the lessons name |
I can find a lesson quickly |
|
Creator |
import from other file formats into lessons |
I can use my own pre-existing lists with the application |
|
Creator |
notify users if there is any change of the app |
I can help users stay updated with new methods |
Appendix C: Use cases
Use case: import a lesson
MSS
-
User downloads file from a source (e.g Internet, other users).
-
User moves the file to the lessons folder.
-
User restarts App.
-
App loads the file as a lesson.
-
App shows loaded lessons in the UI.
Use case ends.
Extensions
-
3a. User inputs invalid file.
-
3a1. App continues loading other lessons.
Use case resumes at step 5.
-
Use case: test poorly memorised questions
MSS
-
User requests to revise poorly/wrongly answered questions
-
App requests for the pool of questions based on the user’s profile
-
App displays questions for User to answer.
-
User to input his answer.
-
App displays the correct answer.
Steps 3-5 are repeated until there are no more questions left to be tested.
Use case ends.
Extensions
-
3a. App detects no questions to be tested now.
-
3a1. App prompts User to continue testing all questions.
-
3a2. User enter yes.
Use case resumes at step 3.
-
Use case: start a review quiz
MSS
-
User finds specified lesson.
-
User starts quiz by lesson name.
-
App displays questions for User to answer.
-
User to input his answer.
-
App displays the correct answer.
Steps 3-5 are repeated until there are no more questions left to be tested.
Use case ends.
Extensions
-
3a. App detects no questions to be reviewed now.
-
3a1. App prompts User no questions to be reviewed now.
Use case ends.
-
Appendix D: Non-functional requirements
-
Should work on any mainstream OS as long as it has Java
9or higher installed. -
Should be able to hold up to 1000 cards in multiple lessons without a noticeable sluggishness in performance for typical usage.
-
Should be able to load 1000 cards within 7 seconds.
-
Product is not required to handle mass data editing (i.e no spreadsheet editing functionality)
-
User data (both lessons and SRS data) should be easily portable
-
A user with above average typing speed for regular English text (i.e. not code, not system admin commands) should be able to accomplish most of the tasks faster using commands than using the mouse.
Appendix E: Glossary
- Card
-
A card contains 2 or more
TESTvalues and 0 or moreHINTvalues. When a card is tested in quiz mode, 2 of itsTESTvalues will be tested as a question-answer pair.HINTvalues will be shown when the\hintcommand is entered. - Lesson
-
A lesson contains cards of the same type and topic. It has 2 or more
TESTvalues and 0 or moreHINTvalues. Cards added to this lesson must have correspondingTESTvalues, but need not have matchingHINTvalues. By default, the first 2TESTvalues of cards in this lesson will be tested when the lesson is started in quiz mode. You can change this by using thesetcommand. - Mainstream OS
-
Windows, Linux, Unix, OS-X
- Session
-
User’s current learning progress
- Spaced Repetition System (SRS)
-
The technique of gradually delaying or accelerating the testing of content based on the user’s success.
Appendix F: Instructions for manual testing
Given below are instructions to test the app manually.
| These instructions only provide a starting point for testers to work on; testers are expected to do more exploratory testing. |
F.1. Launch and shutdown
-
Initial launch
-
Download the jar file and copy into an empty folder
-
Double-click the jar file
Expected: Shows the GUI with a set of sample contacts. The window size may not be optimum.
-
-
Saving window preferences
-
Resize the window to an optimum size. Move the window to a different location. Close the window.
-
Re-launch the app by double-clicking the jar file.
Expected: The most recent window size and location is retained.
-
F.2. Changing theme
Changing from light theme to dark theme.
-
changeTheme -
Exit and start
BrainTrainagain.
Expected: The theme have changed to dark theme and persist beyond restart.
F.3. Adding a lesson
-
Test case (successful):
addLesson n/Capitals of the world t/Country t/Capital t/Language h/Hint
Expected: The lesson is added and appears on the user interface.
Exit the BrainTrain app, and launch it again.
Expected: The lesson 'Capitals of the world' is loaded on app launch. -
Test case (unsuccessful):
addLesson t/Country t/Capital t/Language h/Hint
Expected: No lesson is added because name is missing. Error details are shown to the user. -
Test case (unsuccessful):
addLesson n/Capitals t/Country h/Language h/Hint
Expected: No lesson is added because there is only 1 test value. Error details are shown to the user.
F.4. Deleting a lesson
-
Prerequisite: There is at least 1 lesson loaded in-memory.
-
Test case (successful):
deleteLesson 1
Expected: The first lesson is deleted and no longer appears on the user interface.
Exit the BrainTrain app, and launch it again.
Expected: The lesson is permanently gone and does not re-appear on app restart. -
Test case (unsuccessful):
deleteLesson 0
Expected: No lesson is deleted because of invalid index. Error details are shown to the user. -
Other incorrect
deleteLessoncommands to try:deleteLesson,deleteLesson xwhere x is larger than the number of lessons loaded in-memory
F.5. Editing a lesson
-
Prerequisite: There is at least 1 lesson loaded in-memory.
-
Test case (successful):
edit 1
Expected: The first lesson is opened in Card View for editing. -
Test case (unsuccessful):
edit 0
Expected: No lesson is opened for editing because of invalid index. Error details are shown to the user. -
Other incorrect
editcommands to try:edit,edit xwhere x is larger than the number of lessons loaded in-memory.
F.6. Setting a lesson’s test pair
-
Prerequisite steps:
-
Enter
addLesson n/Capitals of the world t/Country t/Capital t/Language h/Hintto create a lesson -
Enter
edit xwhere x is the number of the lesson added -
Enter
addCard t/Australia t/Canberra t/English h/Starts with Cto add a card -
Enter
addCard t/Korea t/Seoul t/Koreanto add another card
-
-
Test case (successful):
set 1 3
Expected: The user interface indicates that 'Country' and 'Language' are the 2 test values to be tested. -
Test case (successful):
set 3 2
Expected: The user interface indicates that 'Language' and 'Capital' are the 2 test values to be tested. -
Test case (unsuccessful):
set 0 2
Expected: No setting is done because of invalid index. Error details are shown to the user. -
Test case (unsuccessful):
set 1 5
Expected: No setting is done because the lesson only has 3 test values, and there is no test value at index 5. Error details are shown to the user. -
Other incorrect
setcommands to try:set,set x ywhere x or y is larger than the number of test values the lesson has.
F.7. Adding a card
Adding a card.
-
Prerequisite steps:
-
Enter
addLesson n/Capitals of the world t/Country t/Capital t/Language h/Hintto create a lesson -
Enter
edit xwhere x is the number of the lesson added
-
-
Test case (successful):
addCard t/Australia t/Canberra t/English h/Starts with C
Expected: The card is added and appears on the user interface. -
Test case (successful):
addCard t/Korea t/Seoul t/Korean
Expected: The card is added and appears on the user interface. -
Test case (unsuccessful):
addCard t/English h/Starts with C
Expected: No card is added because there is only 1 test value and all cards require at least 2 test values. Error details are shown to the user. -
Test case (unsuccessful):
addCard t/Australia t/Canberra h/Starts with C
Expected: No card is added because there is only 2 test value but the lesson requires 3. Error details are shown to the user.
F.8. Deleting a card
Deleting a card.
-
Prerequisite steps:
-
Enter
addLesson n/Capitals of the world t/Country t/Capital t/Language h/Hintto create a lesson -
Enter
edit xwhere x is the number of the lesson added -
Enter
addCard t/Australia t/Canberra t/English h/Starts with Cto add a card -
Enter
addCard t/Korea t/Seoul t/Koreanto add another card
-
-
Test case (successful):
deleteCard 1
Expected: The first card is deleted and no longer appears on the user interface. -
Test case (unsuccessful):
deleteCard 0
Expected: No card is deleted because of invalid index. Error details are shown to the user. -
Test case (unsuccessful):
deleteCard 100
Expected: No card is deleted because of invalid index. Error details are shown to the user. -
Other incorrect
deleteCardcommands to try:deleteCard,deleteCard xwhere x is larger than the number of cards in the opened lesson.
F.9. Starting a new quiz
Below are some test cases you can perform to test the StartCommand for the Management feature.
-
Prerequisite: The system is in the management mode and there is no opened lesson currently.
-
Test case:
-
start 1 m/preview
Expected: The system and GUI change toQuiz mode. Starting new quiz. Current lesson is the first lesson in the list. Besides, only one card will be previewed in the quiz. -
start 3 c/1 m/learn
Expected: The system and GUI change toQuiz mode. Starting new quiz. Current lesson is the third lesson in the list. Besides, only one card will be learnt in the quiz.
-
F.10. Answering a question in a quiz
Below are some test cases you can perform to test the QuizAnswerCommand for the Quiz feature.
-
Answering questions in
learnmode-
Prerequisite: A quiz have already started.
Start a quiz, for examplestart 1 c/1 m/learn
Replace lesson name with a lesson of your choice.
Answer the question according to the question from the specified lesson. -
Test case:
-
enter or anything without the prefix
\followed by enter
Expected: Shown the question for answering. -
brussels
Expected: Answered the question correct. Total correct question updated. -
belgiu
Expected: Answered the question wrongly once. Total correct question updated. -
belgiuu
Expected: Answered the question wrongly twice and shown the correct answer. Total correct question updated.
-
-
-
Answering questions in
reviewmode-
Prerequisite: A quiz have already started.
Start a quiz, for examplestart 1 c/1 m/review
Replace lesson name with a lesson of your choice.
Answer the question according to the question from the specified lesson. -
Test case:
-
brussels
Expected: Answered the question correct. Total correct question updated. -
belgiu
Expected: Answered the question wrongly once. Total correct question updated. -
belgiuu
Expected: Answered the question wrongly twice and shown the correct answer. Total correct question updated.
-
-
-
Answering questions in
previewmode-
Prerequisite: A quiz have already started.
Start a quiz, for examplestart 1 c/1 m/preview
Replace lesson name with a lesson of your choice.
Answer the question according to the question from the specified lesson. -
Test case:
-
enter or anything without the prefix
\followed by enter
Expected: Shown the next question for previewing.
-
-
F.11. Labelling a question as difficult in a quiz
Below is a test case you can perform to test the QuizDifficultCommand for the Quiz feature.
-
Prerequisite: A quiz have already started.
Start a quiz, for examplestart 1 c/1 m/learn
Replace the lesson name with a lesson of your choice. -
Test case:
-
\difficult
Expected: Card labelled as difficult. -
\difficult
Expected: Card labelled as not difficult.
-
F.12. Viewing hint in a quiz
Below is a test case you can perform to test the QuizHintCommand for the Quiz feature.
-
Prerequisite: A quiz have already started.
Start a quiz, for examplestart 1 c/1 m/review
Replace the lesson name with a lesson of your choice. -
Test case:
\hint
Expected: Shown the hint for this question.
F.13. Quitting the quiz
Below are some test cases you can perform to test the QuizQuitCommand for the Quiz feature.
Prerequisite: A quiz have already started.
Start a quiz, for example start 1 c/1 m/review
Replace lesson name with a lesson of your choice.
Answer the question according to the question from the specified lesson.
-
Test case:
\quit
Expected: Shown the result of the quiz and saved the progress of 0 attempted question. -
Test case:
brussels
\quit
Expected: Shown the result of the quiz and saved the progress of 1 attempted question.
F.14. Viewing status in a quiz
Below is a test cases you can perform to test the QuizStatusCommand for the Quiz feature.
-
Prerequisite: A quiz have already started.
Start a quiz, for examplestart 1 c/1 m/learn
Replace the lesson name with a lesson of your choice. -
Test case:
\status
Expected: Shown the quiz progress.
F.14.1. Saving user data
-
Ensuring that there is a save user file generated. The file should be generated under
/userdata/savedata-
Prerequisites: The user has at least started on a quiz once.
-
NOTE: There will be 5 unique notations generated in the
savedatafile. It is arranged in an array as such [hashcode, number of attempts, streak, SRS date, isDifficult] -
Test case: Open the
savedatafile and modifyhashcode = 0
Expected: Launch braintrain.jar again and open braintrain.log. There should be a warning message stating:"WARNING: There are empty values in the file"
Other incorrect cases: Settingnumber of attempts < 0orstreak < 0.
-